
finally! installed TRD lowering springs on 09
-
vibedrivermatt
- Posts: 599
- Joined: Fri Jan 25, 2008 8:44 am
finally! installed TRD lowering springs on 09
hello! I've installed some lowering springs on my 09 vibe. They're the TRD springs that I first showed pics of in my thread about the Enkei wheels. I did the install myself which was a bit of a learning experience. In the the end everything got installed okay. I still need to get an alignment done.I forgot to take before pictures but you may may be able to tell by looking at it, its definitely a noticeable drop. some pics of the installI got these bags of new top nuts and seals for the struts from GM parts direct. They sent me the wrong part for the new rear strut top nuts. I just ended up reusing my original rear strut top nuts. I got this stuff because the TRD instructions advise you to replace these parts. I try to do stuff by the book most of the time.important note: the two bags of parts at bottom of picture were useless and didn't get used. edit: about reusing the rear top nuts- I think (not for sure on this) they tell you to use new rear top nuts because the new nuts will come with some thread locking compound applied to assure the nuts don't back out. I did not apply any type of thread locker onto the threads when reusing them, so I'll have to periodically check these top nuts and make sure they're not backing out. Its easy to check the rear strut top nuts by popping off the small windows on the plastic trim pieces in the trunk area. various parts and bagged hardware on table.front springtrim parts removed from rearThat's my emergency tow strap! Maybe it'll come in handy with the help of a truck, if my car ever becomes stuck.this is the rear strut with the main parts that go with it. compressing the rear TRD springeven with the TRD spring compressed very far, I was having a hard time getting the top nut back onto the strut. My solution ended up being to put it in a vise and squeeze the whole thing with some hand clamps. I used the clamps to just give a gentle squeeze on the upper and lower spring seats. It did the trickI then had enough thread sticking out to get the top nut on and securely tightened. this was the the best I could do to get the bottom of the rear spring into its seat. The OEM spring is angled down so that it sits in the depression better than the TRD spring. The TRD spring ends in more of a straight angle. It still rests pretty securely on that part of the depression.Unfortunately this spring got scratched up pretty good. At first I had this spring in the big red one piece spring compressor. That compressor was too big and very difficult to get on and off the small rear spring and ended up putting a lot scratches on it. It was much easier to compress the rear spring using the smaller two piece spring compressor kit. The second rear spring I did using the two piece spring compressor kit went much more smoothly and with hardly any scratches. I had some two part epoxy rust primer that I decided to paint onto the scratched up parts of the spring. I felt this was a pretty good fix for the booboo I made. its not pretty but all better!I did this because I didn't want to worry about the spring becoming rusted. this shows how I used the floor jack in combination with some jackstands to jack the reassembled spring/strut back up into the car. here's what it looked like after the strut was back in and jacked back up into the car. I then just had to put the nuts and bolt back in.what the car looks like with the new springs installed. to me its obvious its lower than before well thats it!! this was a fun learning experience even though I messed up a few times along the way. Now I feel pretty confident in doing this type of car repair. If anybody else is wanting to attempt this for the first time I'd recommend for them to check out some youtube videos on it to get a good idea of everything that happens before taking stuff apart. It's also a good idea to read the instructions and have a very good understanding of how the rear struts are to be removed from the car beforehand. so far I've just noticed that the car seems to handle great! the ride isn't noticeably harsher unless you go over a big bump with all four wheels.

Re: finally! installed TRD lowering springs on 09 (vibedrivermatt)
Looks great as always Matt ! Your Vibe is coming together really nicely! So... what's next ?!

-
star_deceiver
- Posts: 5802
- Joined: Fri Jun 05, 2009 1:49 pm
- Location: Airdrie, AB
Re: finally! installed TRD lowering springs on 09 (vibedrivermatt)
Cool!!! So how's the drive? Rip through the twisties yet?
2021 Ram 1500 4x4 CCSB
2019 Ram 3500 4x4 CCSB srw 8HP75 (traded in - 04/15/21)
2016 Ram 3500 4x4 RCLB Dually w/stick (traded in - 05/10/19)
2012 Chevy Silverado 1500 Cheyenne 4x4 (Traded in - 03/30/16)
2009 Vibe. (Traded in - 12/12/12)
2019 Ram 3500 4x4 CCSB srw 8HP75 (traded in - 04/15/21)
2016 Ram 3500 4x4 RCLB Dually w/stick (traded in - 05/10/19)
2012 Chevy Silverado 1500 Cheyenne 4x4 (Traded in - 03/30/16)
2009 Vibe. (Traded in - 12/12/12)
-
A Psycho Martyr

- Posts: 2598
- Joined: Mon Feb 08, 2010 6:13 am
- Location: Cullman, Alabama
Re: finally! installed TRD lowering springs on 09 (vibedrivermatt)
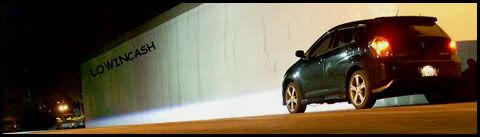
I like ur pic.....so I edit it! muahahahahah!!!!
-
vibedrivermatt
- Posts: 599
- Joined: Fri Jan 25, 2008 8:44 am
Re: finally! installed TRD lowering springs on 09 (A Psycho Martyr)
whoa sweet!! your the man! Maybe I should try put that picture into my sig
-
A Psycho Martyr
- Posts: 2598
- Joined: Mon Feb 08, 2010 6:13 am
- Location: Cullman, Alabama
-
vibedrivermatt
- Posts: 599
- Joined: Fri Jan 25, 2008 8:44 am
Re: finally! installed TRD lowering springs on 09 (A Psycho Martyr)
Whoooa gnarly! Thanks a lot!I might resize this later or make it smaller but I really dig it! cool.
-
A Psycho Martyr
- Posts: 2598
- Joined: Mon Feb 08, 2010 6:13 am
- Location: Cullman, Alabama
Re: (ponta2147)
me too. Hey if you want, I'll make it lower than it really is. Like i'll slam it!
-
A Psycho Martyr
- Posts: 2598
- Joined: Mon Feb 08, 2010 6:13 am
- Location: Cullman, Alabama
-
vibedrivermatt
- Posts: 599
- Joined: Fri Jan 25, 2008 8:44 am
Re: (A Psycho Martyr)
yeah sure! why not have fun with it? although I'm not sure how much time it takes to do all that crazy editing, if you feel up to the task though and make it, I'll put it in my sig.I really like the way the picture is looking now as well.
-
vibedrivermatt
- Posts: 599
- Joined: Fri Jan 25, 2008 8:44 am
Re: (vibedrivermatt)
ohhh cool, I saw the slammed version but I'm actually diggin how the one looks with a more regular stance, so I'm gonna keep that one. but thanks. It was neat to see really lowered vibe
-
A Psycho Martyr
- Posts: 2598
- Joined: Mon Feb 08, 2010 6:13 am
- Location: Cullman, Alabama

Re: (A Psycho Martyr)
At first I thought: "put a little motion blur on the rims," but I love 'em too much!
Steelies to the rescue.
-
A Psycho Martyr
- Posts: 2598
- Joined: Mon Feb 08, 2010 6:13 am
- Location: Cullman, Alabama
Re: (jkm311)
I wanted to really bad, but I couldn't figure out how. everything i tried looked horrid
-
Sublimewind
- Posts: 5140
- Joined: Thu May 24, 2007 4:44 am
Re: (Sublimewind)
Quote, originally posted by vibedrivermatt »ohh thanks! well there's a few more things I'd like to do before I can call it really finishedI'd probably try to do this stuff in this order, but It may take a while with my budget 1. stainless steel brake lines and black painted calipers, also really wanting to replace the two year old brake fluid as part of maintenance (which would get done with the lines), performance brake pad would be nice too2. roof racks, I'd devise a way to paint these black too3. PIAA 410 fogs 4. tinted windows, just trying to figure out if there a shade of tint that's safe to put on my windshield. maybe leave windshield untinted5. smoked head lamps/tail lamps- just a thought at this point don't know if that'll ever happen. 6.stainless steel exhaust tipSounds like a great to do list Matt ! My only suggestion would be to leave the windshield alone. I had a strip of tint put at the top of the windshield and it looked like crap because of the dot matrix around the mirror, so if you tinted the whole windshield it wouldn't look good because of those darn dots. Not to mention you would have to go really light because you wouldn't want to hinder your view out of the windshield at all so it wouldn't really even be worth it. Just my $.02 though.Can't wait to see more progress from you! Keep it up !
-
tpollauf
- Posts: 4188
- Joined: Wed Jan 20, 2010 11:37 am
- Location: Toledo/Oregon, Port Clinton Ohio
- Contact:
Re: (vibedrivermatt)
It's a good thing that the Green shown was not offered as an actual color or I'd be driving one of them for sure. Awesomw color
2009 Vibe GT (5-spd manual), 2004 Vibe GT (6-spd manual)
2014 Silverado, 2026 Ford Maverick Lariat Hybrid
"everything is modifiable"
-
A Psycho Martyr
- Posts: 2598
- Joined: Mon Feb 08, 2010 6:13 am
- Location: Cullman, Alabama
Re: (tpollauf)
heres one w/the wheels in motin too
Attached files
Attached files
-
lovemyraffe
- Posts: 4288
- Joined: Sun Oct 07, 2007 3:08 am

-
vibedrivermatt
- Posts: 599
- Joined: Fri Jan 25, 2008 8:44 am
Re: (VibeBear)
Quote, originally posted by J_TO_ENVY » My only suggestion would be to leave the windshield aloneoh thanks for the suggestion, yeah I was wondering how the tint would stick around the dot matrix thing, guess I wont be attempting the windshield tint. I've got the blurred wheels version in my sig now! Brandon your a genius with the photoshop. nice! Im just realizing now though it looks like my car is moving but with no one driving it. Still cool though like it could be a remote controlled vibe.
Re: (vibedrivermatt)
Great job lowering your vibe! Looks like a good even drop =D As for tinting windshield, it's best to get the lightest shade possible. I have my whole windshield tint with 70% and it blocks out a great amount of heat. 70% is light and it's not even noticeable. I've had 50% and 60% before and they were all fine, just got to get used to driving with it on. It's a much more comfortable drive with the windshield tinted especially during those hot days.
-- 2009 Vibe GT in Jet Black
-
vibedrivermatt
- Posts: 599
- Joined: Fri Jan 25, 2008 8:44 am
Re: (lowincash)
well thanks for everyone's positive comments! I just wanted to put a little follow up in here around how the vibe is handling, maybe could be considered a downside of the lowering springs but, I took the vibe on its first long drive on an interstate with the new springs. After driving for a while, I can certainly say that the ride is a little less comfortable. All the bumps are much more pronounced when your driving for an extended period of time. Not that that kind of ride wasn't expected beforehand. Oh well though, guess I'll just have to get used to it! I'm still happy with having the springs.
-
A Psycho Martyr
- Posts: 2598
- Joined: Mon Feb 08, 2010 6:13 am
- Location: Cullman, Alabama
Re: (vibedrivermatt)
a sacrfice i have to make as well. Low pro's on the twanky's make for bumpy ride sometimesI'm happy with mine too tho