
how to adding fog lights to a base 09+ (no hacking wires)
-
x_GSEadam_X
- Posts: 15
- Joined: Fri Aug 19, 2011 11:51 pm
Re: (peacock)
Let me know if you need a fog light cover. I have an extra left one I will be willing to part with.
-
vzDean1600
- Posts: 13
- Joined: Fri Aug 06, 2010 12:24 pm
- Location: Elora, ON Canada
Re: how to adding fog lights to a base 09+ (no hacking wires
How do you change the turn signal/headlight stalk? Does the steering wheel have to be removed?
Thanks,
Dean
Thanks,
Dean
Re: how to adding fog lights to a base 09+ (no hacking wires
Could someone please tell me if it is possible to replace the stalk without removing the steering wheel ? 

Re: how to adding fog lights to a base 09+ (no hacking wires
A year later...
I was able to get my fogs installed thanks to this post! I was so worried I was going to break my trim, but the pictures posted here helped me locate the fog light relay (such a god-awful spot).
Price of project:
$62.00 - SAE/DOT Yellow Fog Lights for 2007-2008 Camry (generic car part website)
$42.00 - Headlight stalk w/ fog switch for 2009-2010 model - 19184825 (gmpartsdirect.com)
$18.00 - Fog Covers w/ silver trim for base model - 88975659 & 88975660 (gmpartsdirect.com)
$16.00 - Relay for Lexus - 90080-87026 *EXACT same relay as 90987-02027* (eBay)
Total: ~$138.00 + time and effort.
Thank you so much, SpeedEng, Tim, and everyone else on the forums who provided info/advice for newbies like me.


Very happy with how easy it was to get it all together. The only thing I'm having a problem with is the silver trim around my shift knob... It will not sit flush anymore
I was able to get my fogs installed thanks to this post! I was so worried I was going to break my trim, but the pictures posted here helped me locate the fog light relay (such a god-awful spot).
Price of project:
$62.00 - SAE/DOT Yellow Fog Lights for 2007-2008 Camry (generic car part website)
$42.00 - Headlight stalk w/ fog switch for 2009-2010 model - 19184825 (gmpartsdirect.com)
$18.00 - Fog Covers w/ silver trim for base model - 88975659 & 88975660 (gmpartsdirect.com)
$16.00 - Relay for Lexus - 90080-87026 *EXACT same relay as 90987-02027* (eBay)
Total: ~$138.00 + time and effort.
Thank you so much, SpeedEng, Tim, and everyone else on the forums who provided info/advice for newbies like me.
Very happy with how easy it was to get it all together. The only thing I'm having a problem with is the silver trim around my shift knob... It will not sit flush anymore

-
MindBlowin03
- Posts: 5
- Joined: Wed Sep 18, 2013 2:34 pm
- Location: Blakely, PA
Re: how to adding fog lights to a base 09+ (no hacking wires
Started this swap on my '09 AWD but ran into an issue. Got the fog lights/surrounds installed and the relay but Im getting my (removed) kicked on the stalk. I cannot figure out how to get the old stalk out. I removed the steering wheel and plastic surround but cannot remove the stalk itself. Any help is appreciated.
Nevermind, got it figured out. Everything came out great. Ill post some pics when I get time.
Nevermind, got it figured out. Everything came out great. Ill post some pics when I get time.
-Nick
'09 Vibe AWD
'09 Vibe AWD
-
MindBlowin03
- Posts: 5
- Joined: Wed Sep 18, 2013 2:34 pm
- Location: Blakely, PA
Re: how to adding fog lights to a base 09+ (no hacking wires
Just did this mod yesterday. Here are a couple pics.
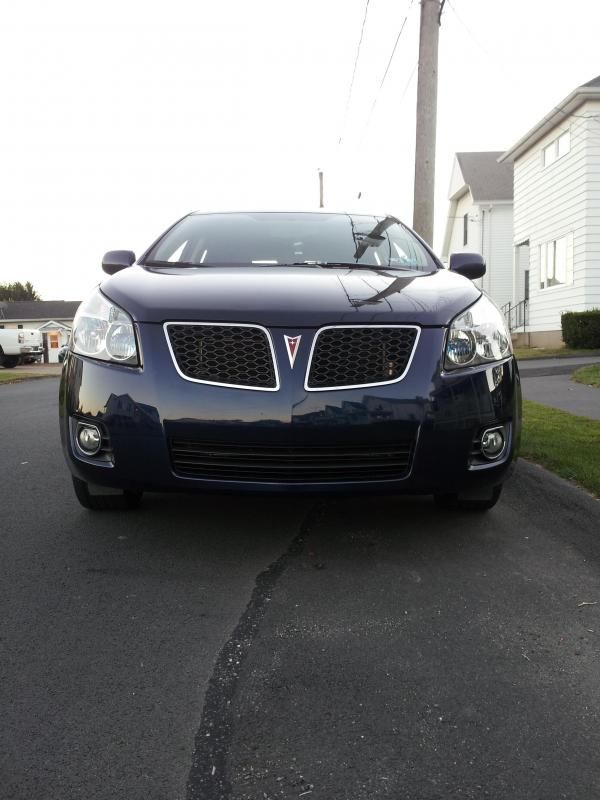
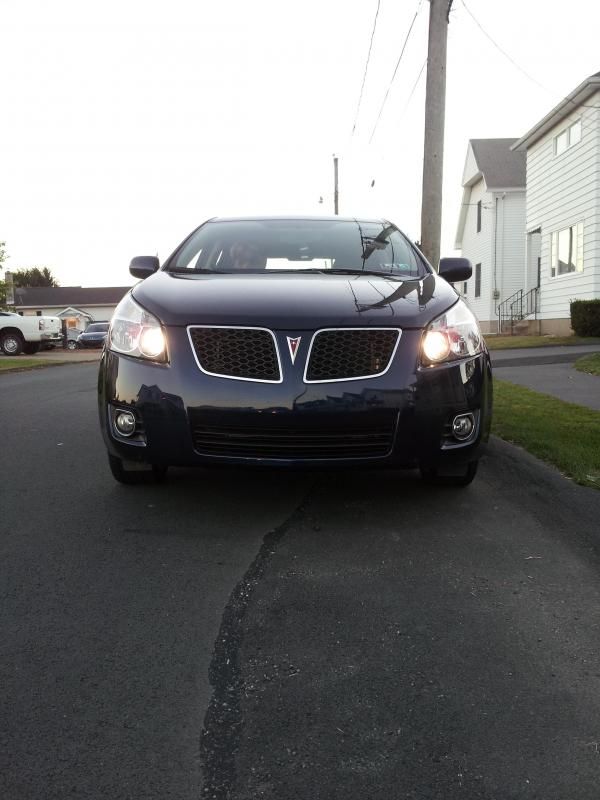
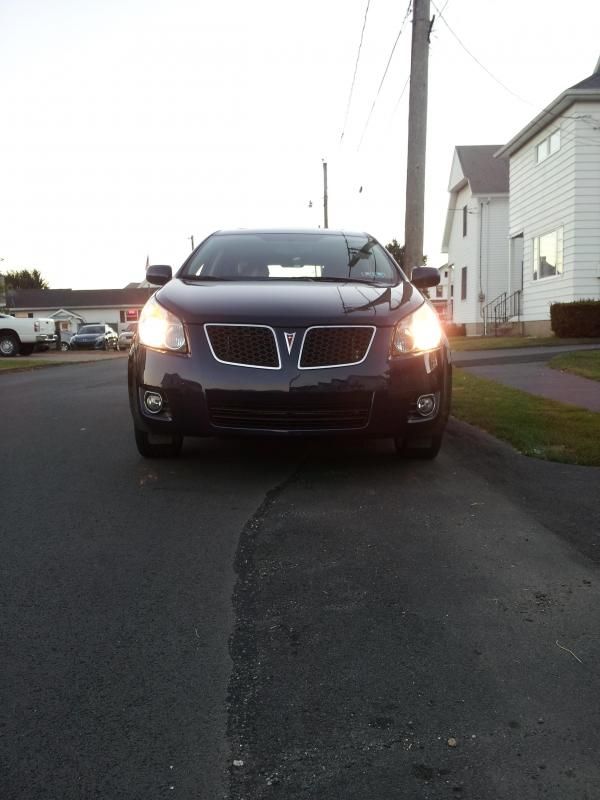

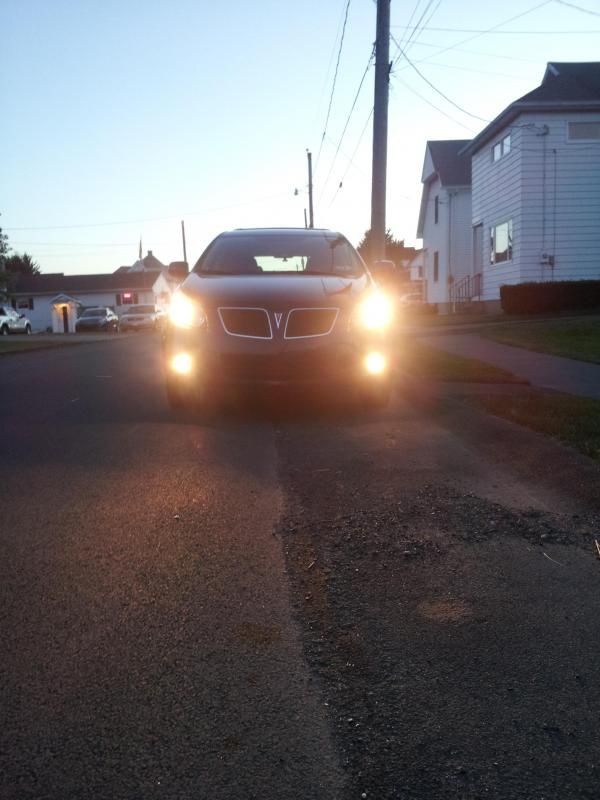


-Nick
'09 Vibe AWD
'09 Vibe AWD
-
BaseWhiteVibe

- Posts: 179
- Joined: Sun Aug 11, 2013 7:16 pm
- Location: Macomb, Michigan
Re: how to adding fog lights to a base 09+ (no hacking wires
So there are tons of Fog Light kits (from a Corolla, Camry, etc, etc.) available that include the lights, bulbs and a rocker switch. Now I was thinking of getting one of these kits and use the rocker switch and simply wiring it into the vehicle harness so that I don't have to replace the light stalk/switch. Does anyone know the pin out for the connector that goes to the turn signal switch? It should be easy to tap into those two wires and then I don't have to spend extra money getting the stalk and I get to use the OEM wiring harness. I greatly appreciate the help! Thank you!
BaseWhiteVibe - As Basic As It Gets!
Re: how to adding fog lights to a base 09+ (no hacking wires
Back after a lengthy absence from the board. Following up on the OEM fog lamp install for the 2009-2010. This has been done by a number of people, notably Speedeng in 2010 and there are similar posts (with pix) on Toyotanation. But no one gives a real blow by blow of the install. I thought I’d detail it. Without pix unfortunately. Hopefully these are detailed enough that if someone wants to try it they can. I see there were several people with questions recently in this topic that this post would address
First off, I wanted to wait till “The Perfect Moment†to do this --- that time happened about 6 weeks ago when I was stopped pointed uphill at an exit road from a parking lot when a motorcyclist turned blind off the street into the lot going too fast to stop -- on seeing me he decided to lay his Yamaha down and try to squeeze under the front of my Vibe. No dice, but fortunately no one was hurt. His tire did do a number on my plastic bumper cover – “The Perfect Moment†to install those fogs........and my first accident of any kind with the vibe
So here is the list of parts, most obtained before the accident. All prices with shipping
2 OEM fog lamp fascia (dealer) $44
2 lamps (Ebay Toyota kit) $46
1 replacement turn signal (Ebay) $35
1 Denso relay #90987-02027 (Ebay) $9
Total $134
The fascia and lamps were new, the relay and stalk were junkyard, but the stalk was like new. I got it from All-foreign auto parts, in Pittsburgh -- they made it real easy to identify the fit on the part, plus they have a phone. The price was great, plus 30 day guarantee. I’d do business with them again for sure -- may be good source for Toyota parts. Mine came with the wiper switch too, but all you need is the left-hand turn switch (which is the main body of the assembly). The wiper switch snaps in and out easily. But to replace the turn signal stalk, you must remove the whole assembly from the column which is essentially a full tear-down of the steering wheel
http://stores.ebay.com/All-Foreign-Auto ... 7675.l2563" onclick="window.open(this.href);return false;
http://www.ebay.com/itm/360716618502?ss ... 1439.l2649" onclick="window.open(this.href);return false;
Now the body shop put on the fascia and lamps when they replaced the bumper cover, and plugged in the lights to the pre-installed cabling. So all I had to do was install (a) the switch (b) the relay. Here are details
DISCLAIMER this is on a 2009 Vibe with the 5-speed transmission. Use at your own risk
Total time 30-60 minutes turn signal, a little less for the relay
SWITCH INSTALLATION
1. IMPORTANT disconnect the battery terminals and let the capacitors discharge for several minutes. Nothing worse than an airbag in the kisser.
2. Remove the column covers, top and bottom, the releases are easy to find, then put em out of the way. Pop off the 1†x 2†covers on either side of the steering wheel using a flexible blade or stiff card. If you have cruise, you’ll have to work the right cover off over the stalk
3. Loosen completely the Torxx screws in there – they have a keeper and don’t have to be retrieved/cant fall out
4. With the wheel centered, mark a center line on top across the wheel, spindle, and switch assemblies, for lining back up when youre re-assemblying. a carpenters pencil works well.
5. The steering wheel cover/airbag should now slip off freely. Disconnect the orange and black wires on the cover side by prying up the white plastic “locks†that free the connector tabs. Lift the tabs straight away from the cover
6. Now loosen the wheel nut (19mm) but leave it threaded on a few turns so when you pop off the wheel you don’t get popped in the face. A couple shakes side to side and top to bottom should do it. Or use a puller if you have one. Remove the wheel, carefully
7. Now you can disconnect the wire connectors to the spindle and to the switch assembly. They are all keyed. Remember where and how these go or take a photo
8. Pull off the spindle, noting its position
9. Now remove the switch assembly. This is the trickiest part. Taking off the wiper switch gives more room to get in there. needle-nose vise-grips work best to hold open the compression clamp, then you have to get a long fine screwdriver blade under the top tab (the one that is notched up) to release the assembly. On the replacement I bought, the tab was already broken off, which is method #2 to release it. It has no function except to provide a “stop†for the depth setting of the switch. When the tab is loose (keep the compression clamp open) pull back on the switch assembly and remove
10. Now install the new switch, centered carefully to match the old one, and clamp in place
11. Replace the spindle and all the wire connectors to switch and spindle (centered).
12. Replace the wheel (centered) threading through the two connectors for the cover, and tighten up the nut
13. Replace the orange and black plugs on the cover – have to lift up the white keys to do this. They only go one way, don’t force them
14. replace the cover and tighten the Torxx nuts, should snug up easily. Replace the hole covers nd the top/bottom column covers
Reconnect the battery and check the everything works again (but the fogs won’t because there is no relay yet)
RELAY INSTALLATION – 5-speed console (this differs from Speedeng’s automatic)
1. gently remove the silver bezel from around the gearshift – use fingers only. The tabs on this piece are quite delicate. When released from console, pry loose the bezel from the leather cover frame (4 slots)
2. remove the top silver cover, fingers again, working from upper left. There is a single underhook in top center that needs to be released. when the cover is free, there will be 2 wires holding, one to flasher and the other to passenger airbag indicator. Leave the flasher connected but release the square airbag indicator (both sides) from the cover to allow you to place the cover out of the way up on dash
3. Remove the 2nd black bezel around the console (under the one you removed in (1) ) , held in by about 5 visible clips around the gearshift. Use a screwdriver to press down the clips one at a time, work your way around
4. Remove the HVAC assembly – there are 4 clamps, 2 on each side. These release easily if you insert a screwdriver ijn the space between clamp and body. Place to left side out of way. NO NEED TO REMOVE RADIO
5. Now remove the two hex screws (7/16â€) holding the relay block. Put the screws on dash and pull up the assembly to expose the relays. The new relay for the fogs goes on the right side just above an existing relay. Only goes in one way. You can check the fogs – they should work now
6. Now reverse the order and put everything back. Easy does it on the trim pieces. The last silver bezel has really delicate tabs and they are easy to bend over, don’t force
The fogs work only when the light switch is engaged on low beams – going to high beams kicks them off.
Four years later, it is finally done...kudos to Speedeng who first did this and encouraged others to try. Bronx cheers to Pontiac (RIP!) for not making the fogs standard equipment. There are some photos on several of Speedeng's posts of the console work, but I think these blow-by-blow instructions will help. Good luck to anyone wanting to give it a shot
First off, I wanted to wait till “The Perfect Moment†to do this --- that time happened about 6 weeks ago when I was stopped pointed uphill at an exit road from a parking lot when a motorcyclist turned blind off the street into the lot going too fast to stop -- on seeing me he decided to lay his Yamaha down and try to squeeze under the front of my Vibe. No dice, but fortunately
So here is the list of parts, most obtained before the accident. All prices with shipping
2 OEM fog lamp fascia (dealer) $44
2 lamps (Ebay Toyota kit) $46
1 replacement turn signal (Ebay) $35
1 Denso relay #90987-02027 (Ebay) $9
Total $134
The fascia and lamps were new, the relay and stalk were junkyard, but the stalk was like new. I got it from All-foreign auto parts, in Pittsburgh -- they made it real easy to identify the fit on the part, plus they have a phone. The price was great, plus 30 day guarantee. I’d do business with them again for sure -- may be good source for Toyota parts. Mine came with the wiper switch too, but all you need is the left-hand turn switch (which is the main body of the assembly). The wiper switch snaps in and out easily. But to replace the turn signal stalk, you must remove the whole assembly from the column which is essentially a full tear-down of the steering wheel
http://stores.ebay.com/All-Foreign-Auto ... 7675.l2563" onclick="window.open(this.href);return false;
http://www.ebay.com/itm/360716618502?ss ... 1439.l2649" onclick="window.open(this.href);return false;
Now the body shop put on the fascia and lamps when they replaced the bumper cover, and plugged in the lights to the pre-installed cabling. So all I had to do was install (a) the switch (b) the relay. Here are details
DISCLAIMER this is on a 2009 Vibe with the 5-speed transmission. Use at your own risk
Total time 30-60 minutes turn signal, a little less for the relay
SWITCH INSTALLATION
1. IMPORTANT disconnect the battery terminals and let the capacitors discharge for several minutes. Nothing worse than an airbag in the kisser.
2. Remove the column covers, top and bottom, the releases are easy to find, then put em out of the way. Pop off the 1†x 2†covers on either side of the steering wheel using a flexible blade or stiff card. If you have cruise, you’ll have to work the right cover off over the stalk
3. Loosen completely the Torxx screws in there – they have a keeper and don’t have to be retrieved/cant fall out
4. With the wheel centered, mark a center line on top across the wheel, spindle, and switch assemblies, for lining back up when youre re-assemblying. a carpenters pencil works well.
5. The steering wheel cover/airbag should now slip off freely. Disconnect the orange and black wires on the cover side by prying up the white plastic “locks†that free the connector tabs. Lift the tabs straight away from the cover
6. Now loosen the wheel nut (19mm) but leave it threaded on a few turns so when you pop off the wheel you don’t get popped in the face. A couple shakes side to side and top to bottom should do it. Or use a puller if you have one. Remove the wheel, carefully
7. Now you can disconnect the wire connectors to the spindle and to the switch assembly. They are all keyed. Remember where and how these go or take a photo
8. Pull off the spindle, noting its position
9. Now remove the switch assembly. This is the trickiest part. Taking off the wiper switch gives more room to get in there. needle-nose vise-grips work best to hold open the compression clamp, then you have to get a long fine screwdriver blade under the top tab (the one that is notched up) to release the assembly. On the replacement I bought, the tab was already broken off, which is method #2 to release it. It has no function except to provide a “stop†for the depth setting of the switch. When the tab is loose (keep the compression clamp open) pull back on the switch assembly and remove
10. Now install the new switch, centered carefully to match the old one, and clamp in place
11. Replace the spindle and all the wire connectors to switch and spindle (centered).
12. Replace the wheel (centered) threading through the two connectors for the cover, and tighten up the nut
13. Replace the orange and black plugs on the cover – have to lift up the white keys to do this. They only go one way, don’t force them
14. replace the cover and tighten the Torxx nuts, should snug up easily. Replace the hole covers nd the top/bottom column covers
Reconnect the battery and check the everything works again (but the fogs won’t because there is no relay yet)
RELAY INSTALLATION – 5-speed console (this differs from Speedeng’s automatic)
1. gently remove the silver bezel from around the gearshift – use fingers only. The tabs on this piece are quite delicate. When released from console, pry loose the bezel from the leather cover frame (4 slots)
2. remove the top silver cover, fingers again, working from upper left. There is a single underhook in top center that needs to be released. when the cover is free, there will be 2 wires holding, one to flasher and the other to passenger airbag indicator. Leave the flasher connected but release the square airbag indicator (both sides) from the cover to allow you to place the cover out of the way up on dash
3. Remove the 2nd black bezel around the console (under the one you removed in (1) ) , held in by about 5 visible clips around the gearshift. Use a screwdriver to press down the clips one at a time, work your way around
4. Remove the HVAC assembly – there are 4 clamps, 2 on each side. These release easily if you insert a screwdriver ijn the space between clamp and body. Place to left side out of way. NO NEED TO REMOVE RADIO
5. Now remove the two hex screws (7/16â€) holding the relay block. Put the screws on dash and pull up the assembly to expose the relays. The new relay for the fogs goes on the right side just above an existing relay. Only goes in one way. You can check the fogs – they should work now
6. Now reverse the order and put everything back. Easy does it on the trim pieces. The last silver bezel has really delicate tabs and they are easy to bend over, don’t force
The fogs work only when the light switch is engaged on low beams – going to high beams kicks them off.
Four years later, it is finally done...kudos to Speedeng who first did this and encouraged others to try. Bronx cheers to Pontiac (RIP!) for not making the fogs standard equipment. There are some photos on several of Speedeng's posts of the console work, but I think these blow-by-blow instructions will help. Good luck to anyone wanting to give it a shot
Gamma Vibe ==> 2007 Base 5-speed, Neptune
Delta Vibe ==> 2009 Base 2.4L 5-speed, Red Hot Metallic
but still more bikes than Vibes....
Delta Vibe ==> 2009 Base 2.4L 5-speed, Red Hot Metallic
but still more bikes than Vibes....