Page 1 of 2
liqorboxracing 03 Base Model Vibe in Abyss
Posted: Wed Oct 14, 2015 6:06 pm
by liquorboxracing
Hello Everyone.
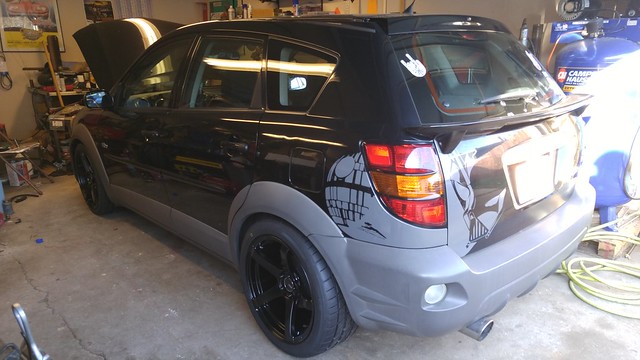
My Name is Tim, I'm a long time Vibe owner, bought mine new in 03 from Dan Hem Chevrolet Pontiac Olds. I used to belong to this forum many years ago. Can't remember my old user name or password though. I live in a suburb of Dayton Ohio and have driven my little Vibe for 172,000 miles now. By far, hands down the best car I've ever owned. I bought the car back when my oldest son was 4 and my youngest son was 2. I always thought I would hand the little car down to one of my kids if it was still running when they got old enough. I just bought my oldest son his first car and possibly buying my youngest his first one very soon! I guess after 12 long years with this little car I couldn't bring myself to hand it off to my kids. I've become quite attached to this little car.
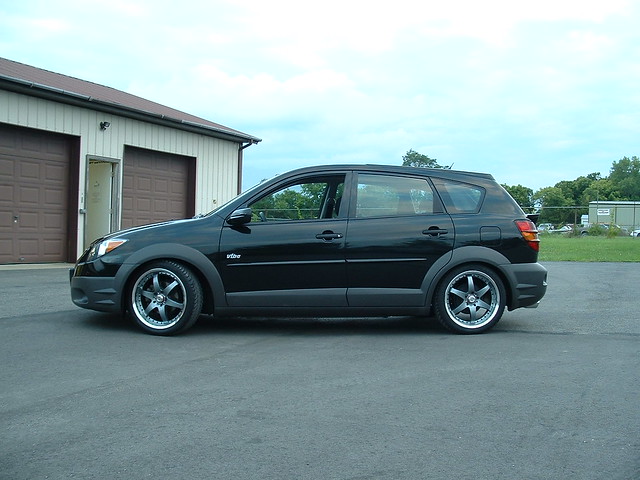
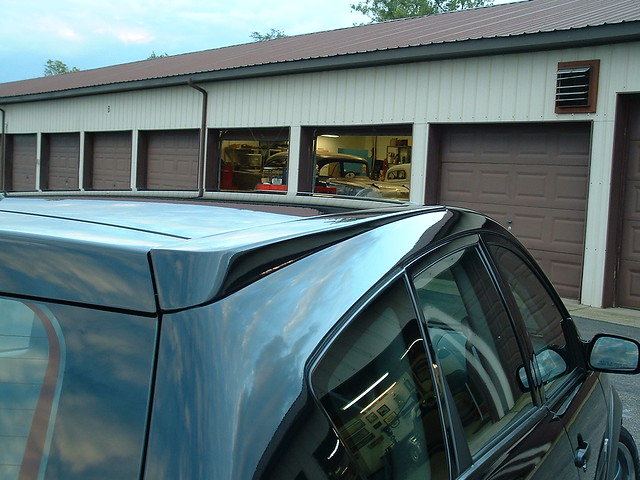
I lowered the car with Skunk 2 coil overs back in 04 once I had put about 30,000 miles on the car. I added Tenzo racing 18" wheels, factory rear deck wing, a Magnaflow exhaust and an AEM cold air intake. I've attached pics of the car from back in 2004. I do not have any recent pics of my car uploaded on line but I will get some up soon. I had to sell my Tenzo wheels many years ago to help pay the many bills you get when raising two kids, and I just recently replaced the worn out and badly abused Skunk2 Coil Overs with new KYB struts and Tein S tech springs. I had forgotten how good this little car used to ride. The coil overs used to beat me to death. Car still sets about the same height it is in the pics below, and I'm getting ready to give her a major face lift. She needs the paint freshened up on her and new headlights as the original units are very hazy and yellow now. I plan on getting another set of 18" wheels for it come next spring and doing a few other mods to her as well. The little car is still my daily driver and I hope she remains that way for some time to come.
 2nr wagon 063
 by
Tim Robbins, on Flickr
 2nr wagon 064
 by
Tim Robbins, on Flickr
Re: liqorboxracing 03 Base Model Vibe in Abyss
Posted: Wed Oct 14, 2015 8:17 pm
by vibrologist
Welcome, or welcome back!
That's one sharp looking Abyss. I hope you can shine it up to almost the same level!
Re: liqorboxracing 03 Base Model Vibe in Abyss
Posted: Thu Oct 15, 2015 5:52 am
by thebarber
Re: liqorboxracing 03 Base Model Vibe in Abyss
Posted: Thu Oct 15, 2015 2:48 pm
by vibenvy
Welcome back! Great looking Vibe! I look forward to seeing current pictures and seeing what new mods you end up doing.
Re: liqorboxracing 03 Base Model Vibe in Abyss
Posted: Fri Oct 16, 2015 6:01 am
by tpollauf
Welcome back Tim from another Tim ..... and also from Ohio

BTW ... I love some of the random pics from your photography site. Very professional and creative

Looking forward to current pics of your Vibe.
Re: liqorboxracing 03 Base Model Vibe in Abyss
Posted: Sat Oct 17, 2015 7:02 pm
by trb
Welcome back! Those are some good pics of a nice looking Vibe! I do like the two tone on the Abyss Vibes. Looking forward to some new shots of it.
Re: liqorboxracing 03 Base Model Vibe in Abyss
Posted: Sun Oct 18, 2015 7:27 am
by ImUrOBGYN
Welcome back. I'll add to the Tims as I know another Tim who's a photographer who also lives here in Ohio. Columbus to be exact. lol This Tim, however, does not own a Vibe/Matrix.

Re: liqorboxracing 03 Base Model Vibe in Abyss
Posted: Wed Oct 21, 2015 6:46 pm
by Nathankenney94
That is a very nice car good job keeping it so nice.
Re: liqorboxracing 03 Base Model Vibe in Abyss
Posted: Mon Oct 26, 2015 7:11 pm
by liquorboxracing
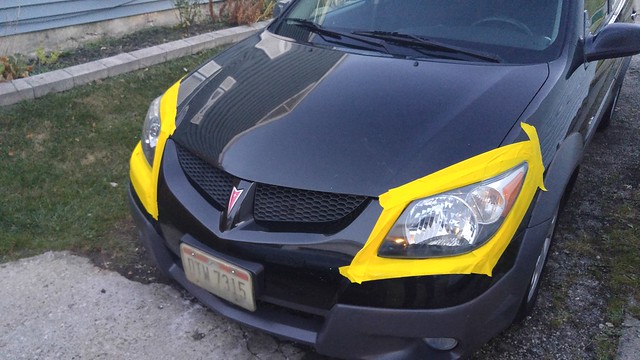
Getting things ready for the winter months. Got a good coat of wax on her and polished the head lights.
 20151026_184911
 by
Tim Robbins, on Flickr
el carro de la estacion de lucha libre!
 20151026_184924
 by
Tim Robbins, on Flickr
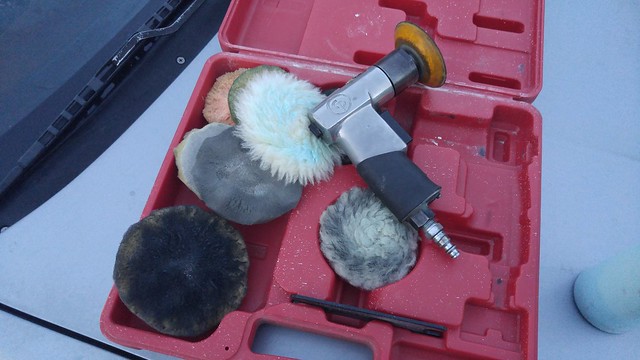
Secret Weapon!
 20151026_185028
 by
Tim Robbins, on Flickr
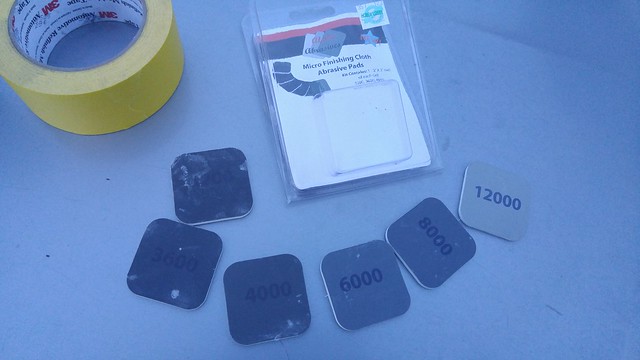
And the real secret to keeping them clean and clear looking.
Re: liqorboxracing 03 Base Model Vibe in Abyss
Posted: Tue Nov 03, 2015 4:41 pm
by liquorboxracing
 20151103_191359
 by
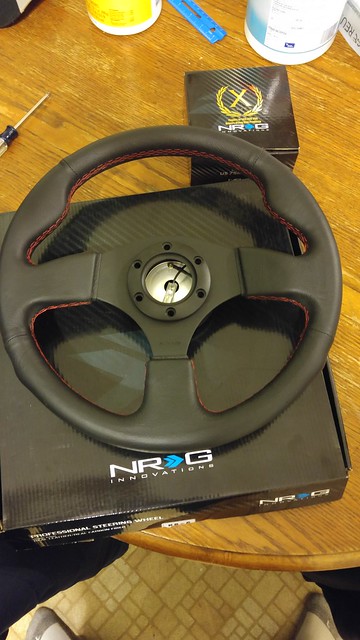
Tim Robbins, on Flickr
Well I am going to install an aftermarket steering wheel on the vibe. The NRG wheel pictured above to be exact! Been wanting one for awhile now and decided what the hell, lets do it! But first I needed to address the elephant in the closet, the Air Bags, and the (removed) poor system that controls them. After countless recalls for the air bag system I decided they are no longer a life saving device as much as they are a life threatening device.
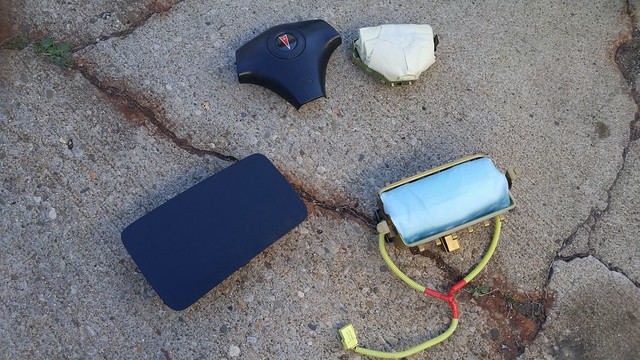
( My opinion! Don't hate me for having an opinion! ) So I decided awhile ago to just unplug mine. Today I decided they were in my way and hindering me from the interior mods I really wanted to do to the car. Since my steering wheel came in yesterday, and my Air Bags were already unplugged I figured what the hell, so today the bags came out. Removing the steering wheel air bag was as simple as removing two screws and setting the air bag aside, since I had already unplugged mine from the clock spring ( or spiral cable as Toyota calls it .) I removed the clock spring as well after removing my factory steering wheel. The passenger air bag was more difficult. Well more difficult to get to, not to get it out. The one screw that holds the passenger bag in was easy to get to and remove, but the two nuts along the sides were the difficult part of the removal. Access is tight on both nuts, but once out though removal is just unplugging the main connector lead and popping the plastic clips around the dash panel insert and lifting the air bag assembly out. The plug has an unusual lock on it. You have to push the locking tab in and slide the release lever up and the plug will come undone at that point. One word of warning though! When lifting the air bag out of my dash the split wiring harness got caught on the underlying components and literally yanked the bag assembly out of my hands and it dropped onto my dash and scratched it in two small spots. So I will seek my revenge on the air bag this weekend when I amuse myself by setting it off.
The best news about all this is the plastic cover over both bags is easily removed by just gently prying it off. The dash cover even pops back in place on the passenger side of the dash to cover the hole again! Bonus!!!! Horn cover comes off the wheel air bag as well, but is pretty much useless as there is nothing to hold it to the steering wheel anymore.
 20151103_161051
 by
Tim Robbins, on Flickr
There are a few obstacle I still need to overcome before I can install this steering wheel. One is the canceling cam on the back of the clock spring is needed if my turn signal switch is going to self cancel again. Two is my cruise control switch will need to be relocated and re wired for it to function again. Third is making the horn work on the new wheel. I figure I have a couple options to get around this. I can fabricate a panel to hold a contact pin that will stay in contact with the copper horn ring on the back side of the new hub or I can move my horn button to the dash and use some kind of really cool horn button instaed. And last but not least is the plastic bottom column cover gap around the new hub. The gap around the top cover is fine, it fits nicely around the new hub, the lower cover though has an uneven gapping gap so all of the clock spring could be visible when the factory wheel is removed! Damn you Toyota!!!!

So I will need to make a filler piece to fix this gap to the new hub. Minor problems, and none to difficult to overcome. I'm waiting on my quick release hub and spacer still so it will be a bit before I get these mods done and the wheel installed. I'll post pics of the progress.
Re: liqorboxracing 03 Base Model Vibe in Abyss
Posted: Wed Nov 04, 2015 9:20 am
by thebarber
you MAY want to think about telling your insurance company your car doesnt have airbags...just in case
Re: liqorboxracing 03 Base Model Vibe in Abyss
Posted: Wed Nov 04, 2015 6:53 pm
by liquorboxracing
by thebarber » Wed Nov 04, 2015 12:20 pm
you MAY want to think about telling your insurance company your car doesn't have airbags...just in case
Uhh! NO! I mean I really don't want to!!

I am paying for liability insurance only. I stopped paying for full coverage insurance the moment the car depreciated below insurance replacement value. I' don't believe my insurance wouldn't pay for my medical bills if I were injured in an accident even if the airbags were still in it. I'm so not giving them an excuse to throw a price hike at me for removing something off
MY car that they wouldn't cover me for or pay for in the first place. Besides, I've saved a boat load of money by not telling my insurance company about all the mods I've done to my car!
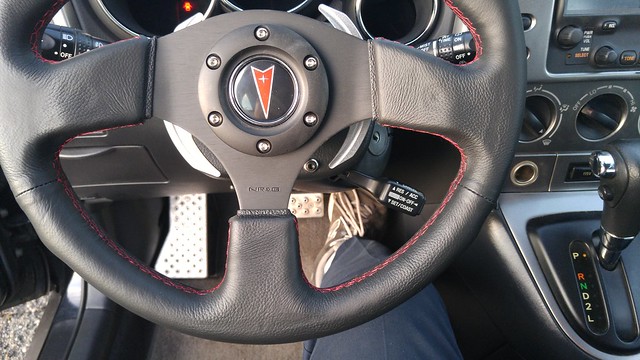
On a more serious note, I put my new steering wheel on this evening!
 20151104_191556
 by
Tim Robbins, on Flickr
Re: liqorboxracing 03 Base Model Vibe in Abyss
Posted: Fri Nov 06, 2015 5:36 pm
by vibenvy
Steering wheel looks good!
On a bit of a side note, where did you get your pedal covers and dead pedal?
Re: liqorboxracing 03 Base Model Vibe in Abyss
Posted: Fri Nov 06, 2015 8:03 pm
by liquorboxracing
by vibenvy » Fri Nov 06, 2015 8:36 pm
Steering wheel looks good!
On a bit of a side note, where did you get your pedal covers and dead pedal?
I made them from sheet aluminum, way back in 2004 when I first lowered the car. They are in need of a good sanding again. I thought I had a couple pics of them off the car, but I can't find them on me hard drive. I made a bunch of little items for it back when I first modified it back in 04. I made a stainless battery hold down and the roof rack delete covers. I formed the rack delete covers from sheet aluminum as well.
 at dons 115
 by
Tim Robbins, on Flickr
 2nr wagon 061
 by
Tim Robbins, on Flickr
Re: liqorboxracing 03 Base Model Vibe in Abyss
Posted: Sat Nov 07, 2015 2:40 pm
by liquorboxracing
 20151107_171035
 by
Tim Robbins, on Flickr
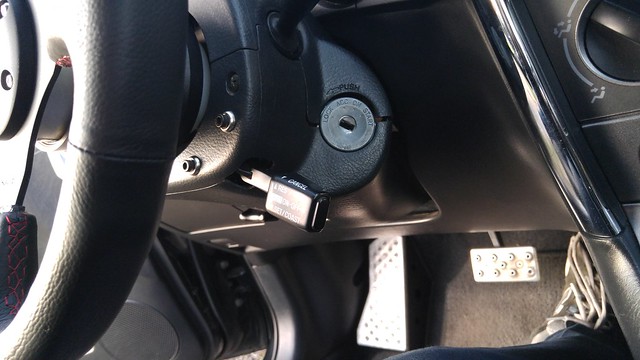
Well I found a place to re-locate the cruise control switch after doing the after market steering wheel install. I modified the lower column cover by putting a hole in it for the lever to pass through. I used two threaded .750 inch long stand offs to mount the switch and space it off from the inside of the panel as pictured here.
 20151107_170354
 by
Tim Robbins, on Flickr
I located two holes in the face of the cover and bolted the switch in place.
 20151107_171059
 by
Tim Robbins, on Flickr
I will wire it up Monday at work. That's where all my electrical tools are, as well as the three position plug connectors I will be using. That'll solve the problem of my cruise control, so next I will take care of the gapping hole under the steering wheel hub in the bottom column cover.
Re: liqorboxracing 03 Base Model Vibe in Abyss
Posted: Sat Nov 07, 2015 3:30 pm
by Derf
Quite the upgrade, also like the dead pedal cover. I have come to miss the dead pedal when I drive other vehicles, left foot feels out of place.
Re: liqorboxracing 03 Base Model Vibe in Abyss
Posted: Sat Nov 07, 2015 4:47 pm
by vibenvy
liquorboxracing wrote:I made them from sheet aluminum, way back in 2004 when I first lowered the car. They are in need of a good sanding again. I thought I had a couple pics of them off the car, but I can't find them on me hard drive. I made a bunch of little items for it back when I first modified it back in 04. I made a stainless battery hold down and the roof rack delete covers. I formed the rack delete covers from sheet aluminum as well.
at dons 115 by
Tim Robbins, on Flickr
2nr wagon 061 by
Tim Robbins, on Flickr
Wow! That's very impressive that you made the pedal covers and roof rack delete! The roof rack delete looks amazing!
Re: liqorboxracing 03 Base Model Vibe in Abyss
Posted: Sun Nov 08, 2015 9:22 am
by tpollauf
Very nice work Tim
The similarities between us Tim's are numerous ... but I think you might have a bit more free time on your hands. I'm hoping to get my shop cleaned up this fall to where I can enter it and actually perform a few "off season" mods to my Vibe. Keep up the good work

Re: liqorboxracing 03 Base Model Vibe in Abyss
Posted: Sun Nov 08, 2015 7:38 pm
by trb
tpollauf wrote:Very nice work Tim
The similarities between us Tim's are numerous ...
And how about Tim the Tool Man, Tim Allen. It
must be something about the name!
Great job on the mods Tim!
Re: liqorboxracing 03 Base Model Vibe in Abyss
Posted: Mon Nov 09, 2015 2:58 pm
by liquorboxracing
by tpollauf » Sun Nov 08, 2015 12:22 pm
The similarities between us Tim's are numerous ... but I think you might have a bit more free time on your hands. I'm hoping to get my shop cleaned up this fall to where I can enter it and actually perform a few "off season" mods to my Vibe.
I'm sorry but I don't know what this Free Time is that you speak of?
My son's and I have been thrashing to get unfinished old projects buttoned up and un-needed stuff sold and or out of the way so we can get our shop straightened up for the same reasons tpollauf. Hopefully I can get it all ready before the snow starts to fly. Fingers crossed.
Well I'm off to drain my water heater. Free time. That's funny.

Re: liqorboxracing 03 Base Model Vibe in Abyss
Posted: Fri Jan 01, 2016 4:25 pm
by liquorboxracing
Well my awesome and beautiful wife bought me a complete Pioneer audio/DVD system for my Vibe for Christmas. Complete with 6 1/2" component front speakers with external tweeters and cross overs, and 6 1/2" coaxial rear speakers. She even bought me the installation kit and wiring harness adapter. Yup! She's a keeper!
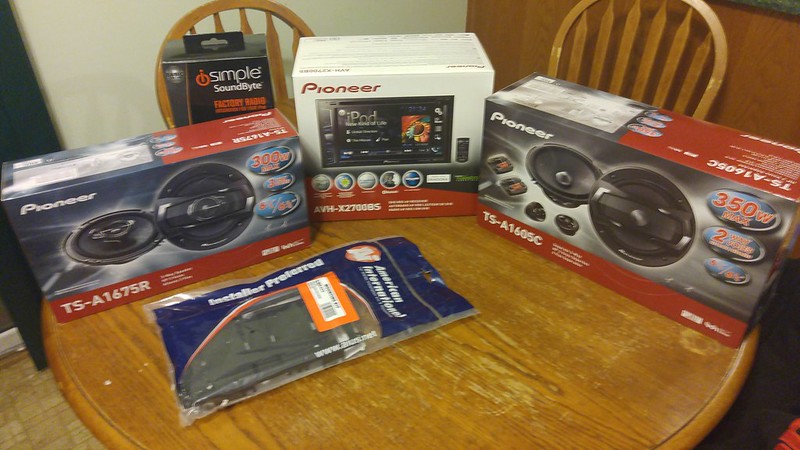 20151203_184029
 by
Tim Robbins, on Flickr
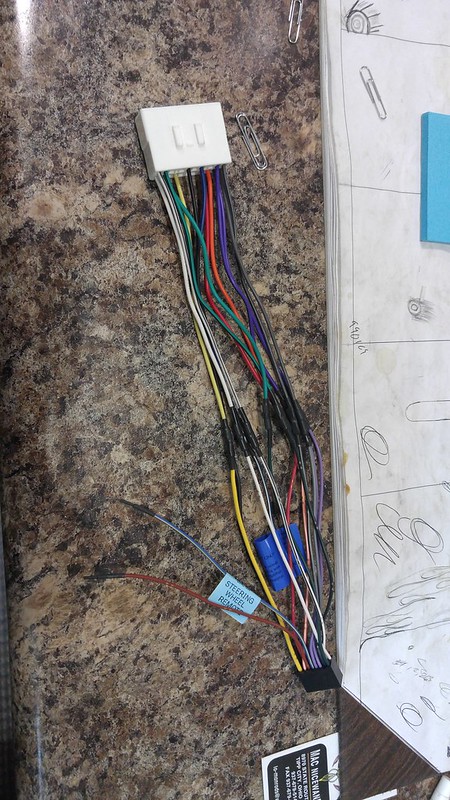
I wired the harness first soldering all the leads together and heat shrinking each one. I then mounted the head unit to the install mounting kit and it was ready to go in the car at this point. Hardest part for the install was routing the mic for the hands free Bluetooth, and routing the safety wire to the parking brake switch. I also had a USB cable to route but that was the easiest of the three additional items I had to route. I do not like this park brake safety wire feature now that I have it hooked up. I am going to bypass it with a relay in the next couple weeks. Basically it renders the head unit unable to play a DVD unless the parking brake is applied. I understand the concept behind it's design but would really like for passengers to be able to watch a DVD if on a road trip.
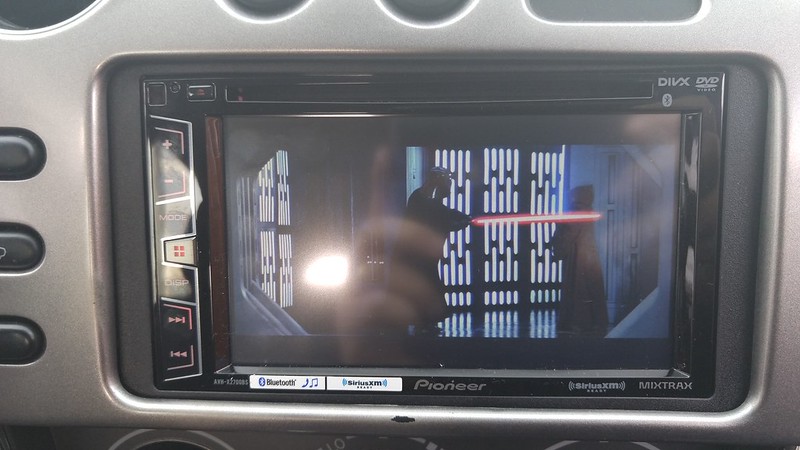
 Message_1447956011965
 by
Tim Robbins, on Flickr
The install went pretty painlessly with the head unit. The speakers were a bit more difficult. I tackled the front doors first as there was a lot more wiring to do with the cross overs. I removed the blown and worse for ware stock speakers from the front doors and to my surprise realized they both had what appeared to be water damage. After careful evaluation I confirmed both had been wet. In fact both had been very wet at one time. I started checking for leaks in the door around the windows and seals and after an hour with the hose on both doors I gave up on locating a significant leak. Both doors got water inside them mind you, but not enough to get overly upset about and very little of it was dripping over where the speakers mount. So now I'm puzzled. ??????
 20151206_203315
 by
Tim Robbins, on Flickr
I'll ponder on this for a bit. Back to the speaker install. I was unable to find anyone local or online who had the Schosche speaker adapter mounts for Matrix/Vibes in stock, so I bought a 4 x 8ft piece of 3/4" MDF board and made my own mounts. I added some Dynomat Dynaliner to the inside of the door to help deaden vibration and reduce rattles, installed and wired the speakers and cross overs and then started on the tweeters. I removed the factory tweeters from their mounts and carefully located the new ones centering them on the mounts. The new tweeters are the same size as the factory ones so they fit right back in place behind the covers without any modifications. I reinstalled the vapor barrier and inner door panel and then moved onto the rear doors. I found water damage on both speakers in the rear doors as well. I repeated the mounts from MDF process and the Dynaliner I did on the front the doors for the rear, and after wiring, reinstalling the vapor barrier and inner door panel this install was done! Man this system sounds awesome!!! I forgot what it was like to have a working radio in the car. I don't know how to act having one that can do all the cool stuff this one can do. Hands free calling from my drivers seat, Pandora and I-Heart radio, DVD player! My wife spoils me! I love Her!!!
 20151206_122128
 by
Tim Robbins, on Flickr
Re: liqorboxracing 03 Base Model Vibe in Abyss
Posted: Fri Jan 01, 2016 9:44 pm
by trb
Nice install Tim! I agree on the parking brake wire. I ended up getting a bypass for my son's car also, and told him to make sure he puts a cardboard shield on the driver's side of the screen so he "can't see" the screen while he is driving. And thanks for the info on the speaker adapters. I've been planning on new speakers for my GT , so I'll check out those you got.
Enjoy it!
Re: liqorboxracing 03 Base Model Vibe in Abyss
Posted: Sat Jan 02, 2016 7:27 am
by Derf
liquorboxracing wrote: removed the blown stock speakers from the front doors and to my surprise realized they both had what appeared to be water damage. After careful evaluation I confirmed both had been wet. In fact both had been very wet at one time. I started checking for leaks in the door around the windows and seals and after an hour with the hose on both doors I gave up on locating a significant leak. Both doors got water inside them mind you, but not enough to get overly upset about and very little of it was dripping over where the speakers mount. So now I'm puzzled. ??????
Water does run inside the doors. In my case when the windows go up and down the outside plastic lip would slide out of position. This allowed water running down the outside of the window into the joint between the bottom window weatherstrip and the side window track weather strip. I adjusted the bottom weatherstrip then used hot glue to fill the gaps to keep it from sliding out of position.
Re: liqorboxracing 03 Base Model Vibe in Abyss
Posted: Sat Jan 02, 2016 3:44 pm
by tpollauf
Like Derf said "very nice install Tim
" Unfortunately I won't be doing a mod like this for a very long time to either of our Vibes BUT want to sooooo bad! Juniors Vibe GT still has active Onstar and uses the HU for functions. Plus, nobody has yet to successfully integrate the steering wheel controls to aftermarket HU's and I live by those controls (as do almost every other 09-10 owner who has them). I will be replacing front speakers in MY vibe GT soon as the crackling sound from the vibration (due to low bass on certain songs) is starting to drive me nuts!
Also, I think I complimented you on this before, but love your photographic website
Lots of variety, good models (both machine & humans) and well done. Keep up the good work
Re: liqorboxracing 03 Base Model Vibe in Abyss
Posted: Sat Jan 02, 2016 7:16 pm
by B14CK_H4WK
i really like the steering wheel. looks really good!
Re: liqorboxracing 03 Base Model Vibe in Abyss
Posted: Sat Jan 02, 2016 8:35 pm
by liquorboxracing
Thanks for the compliments guys.
trb wrote:Nice install Tim! I agree on the parking brake wire. I ended up getting a bypass for my son's car also, and told him to make sure he puts a cardboard shield on the driver's side of the screen so he "can't see" the screen while he is driving. And thanks for the info on the speaker adapters. I've been planning on new speakers for my GT , so I'll check out those you got.
Enjoy it!
I wasn't able to find anyone with the Schosche Speaker mounts in stock when I installed my speakers so I had to make my mounts. But here is the part number at Crutchfield for them if anyone wants them.
http://www.crutchfield.com/S-XontcoFOyY ... ckets.html
I also found these after I already had mine mounted. hey are supposed to be for the 03-08 Vibe/Matrix
Platform as wll as other vehicals.
http://www.amazon.com/Aftermarket-6-5-I ... B007ZQGZWO
http://www.amazon.com/Metra-82-8148-Spe ... 9BCKP4ADRQ
tpollauf wrote:Also, I think I complimented you on this before, but love your photographic website
Lots of variety, good models (both machine & humans) and well done. Keep up the good work
Thanks tpollauf. I am way behind on posting updates to my site. I lost all my Dreamweaver website files after upgrading my laptop to Windows 10 last October. I have all the photos and interviews still, Thank God, but all the Dreamweaver were lost. I'm slowly piecing a new site together and this time storing it on it's own external hard drive like I do my photos. Hope to have it ready to re-launch by spring.
Re: liqorboxracing 03 Base Model Vibe in Abyss
Posted: Fri Mar 04, 2016 7:26 pm
by liquorboxracing
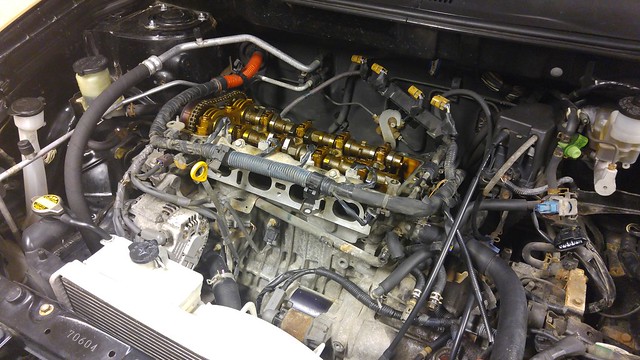
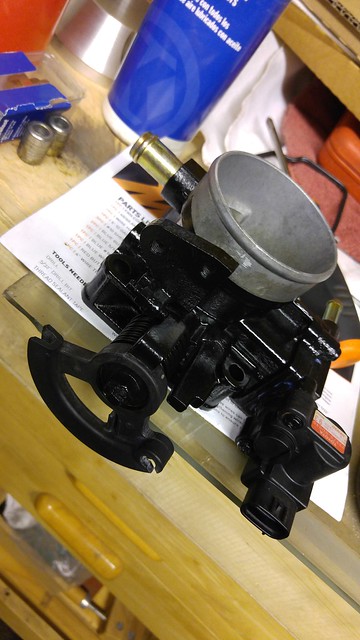
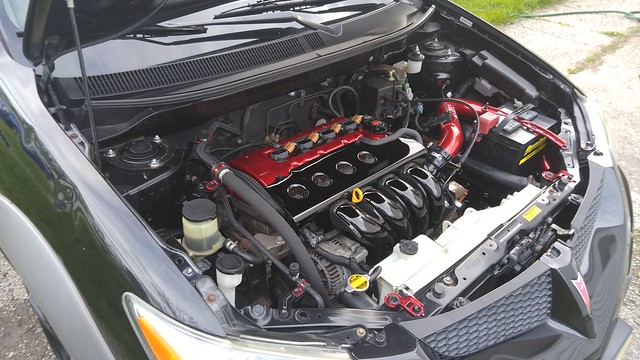
I'm doing some major changes to my Vibe. After 180,000 miles I felt it was long over due for some much needed maintenance and a tune up. I was starting to get some idling problems and suspected it was the IAC causing them so I planed on removing the throttle body to remove and clean the IAC. When removing my cold air intake I found that the lower rubber mount had disintegrated, apparently many miles ago, and my cold air intake had been rubbing against the inner wheel house. The wheel house had actually rubbed a hole in the aluminum intake tube. After removing the throttle body I found oil in my intake and realized I had never replaced the PCV valve since I bought the car. Man that made me feel like an idiot. I should have replaced that at least twice by now. So I removed the intake and cleaned it inside and out and ordered all new gaskets for it and the throttle body.
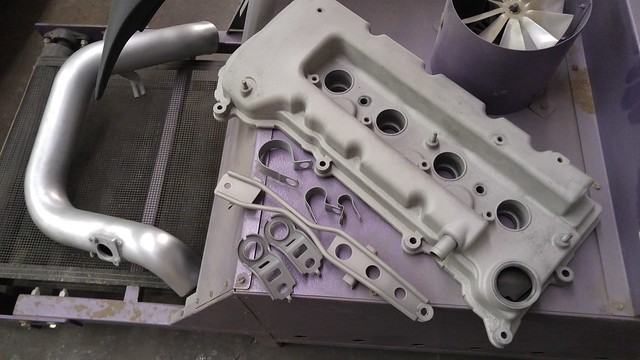
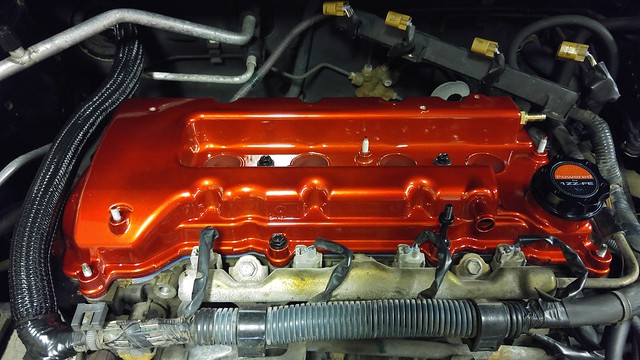
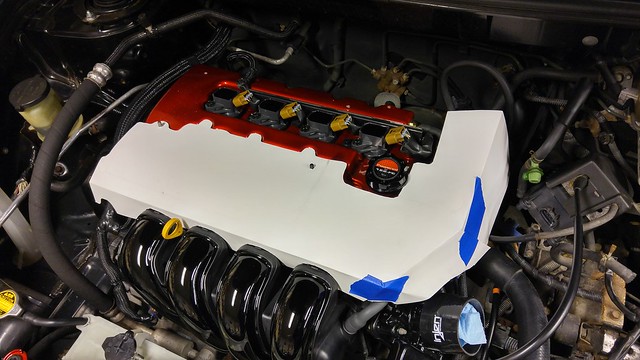
I ordered a new cold air intake from Injen and after doing so got to really looking at the neglected engine bay. I decided this little car deserves so much better than this. So I removed the valve cover and began removing some of the rusty brackets that were holding the A/C lines, and I removed the battery tray mount and upper radiator mount brackets. I sand blasted and cleaned off all the rust and old paint from the brackets and mounts, and sent them off to be powder coated. I also cleaned and blasted the valve cover and prepped the new polished cold air intake for powder coating as well. I then prepped and masked up my intake manifold runners so they could be painted. I will no longer be running the plastic engine cover and I will be making some new aluminum cover panels for different areas in the engine compartment to hide some of the more unsightly areas that can not be so easily beautified with the engine in the car. Here are some pics so far. Much more to come.
 20160303_201847
 by
Tim Robbins, on Flickr
 20160225_180259
 by
Tim Robbins, on Flickr
 20160301_175732
 by
Tim Robbins, on Flickr
 20160301_221932
 by
Tim Robbins, on Flickr
 20160304_073603
 by
Tim Robbins, on Flickr
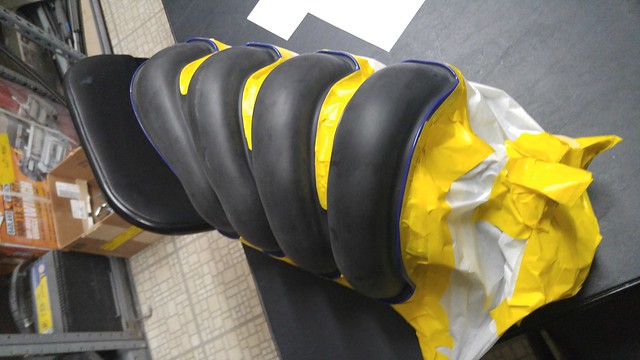
Oh, and here's another little upgrade my Vibe is getting. Here are the new Enkei Kojin rear wheels that are going to be stuffed up under the back. I have the fronts also, but they hadn't arrived yet when I took this pic, and the tires are ordered and on the way as well.
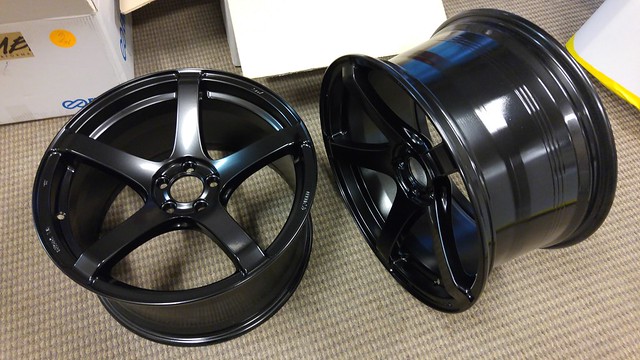 20160212_125833
 by
Tim Robbins, on Flickr
Re: liqorboxracing 03 Base Model Vibe in Abyss
Posted: Sat Mar 05, 2016 3:21 pm
by vibenvy
Nice updates Tim! The engine is going to look really good once everything is re-installed! I absolutely love those wheels! I was considering the silver ones for a while. I saw on Facebook that you, your wife and the Vibe are coming to Nashville for the meet! Looking forward to meeting you guys and seeing the Vibe in person

!
Re: liqorboxracing 03 Base Model Vibe in Abyss
Posted: Tue Mar 08, 2016 6:54 pm
by liquorboxracing
 20160308_172036
 by
Tim Robbins, on Flickr
Intake is painted. Can't wait to get this back on the engine. I changed the spark plugs tonight, and man it was time to do that. The plugs were completely spent, and there wasn't that many miles on them either. Only around 40,000 on Bosch Platinum's. I put Denzo's back in it this time.
 20160308_172053
 by
Tim Robbins, on Flickr
Tires came in yesterday and I dropped them off to be mounted on the new Enkei's today. I'll pick them up tomorrow morning.
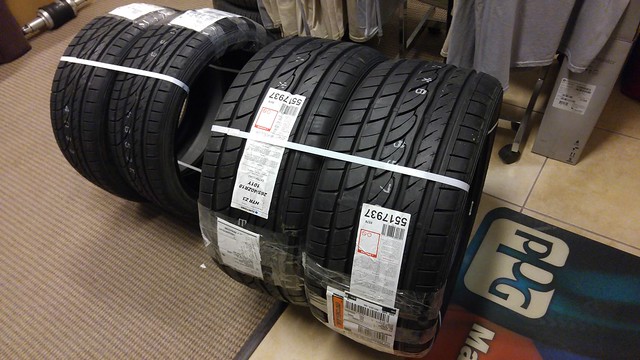 20160307_172126
 by
Tim Robbins, on Flickr
Re: liqorboxracing 03 Base Model Vibe in Abyss
Posted: Wed Mar 09, 2016 2:27 pm
by vibenvy
Wow, that manifold is beautiful! What tires did you get?
Re: liqorboxracing 03 Base Model Vibe in Abyss
Posted: Wed Mar 09, 2016 7:12 pm
by liquorboxracing
vibenvy wrote:Wow, that manifold is beautiful! What tires did you get?
Sumitomo HTR ZIII's! Actually I'm a bit puzzled at the fitment of the front tires. My front rims are 18 x 8's and these front tires (215/40ZR18) were supposed to have a 8.5 section width but they seemed to be stretched onto these 8" rims. Don't look bad but not what I was expecting. I need to investigate this more. The rears are perfect, and huge!!! 265/40ZR18.
Some modifications are needed to fit this rear wheel and tire on a Vibe.
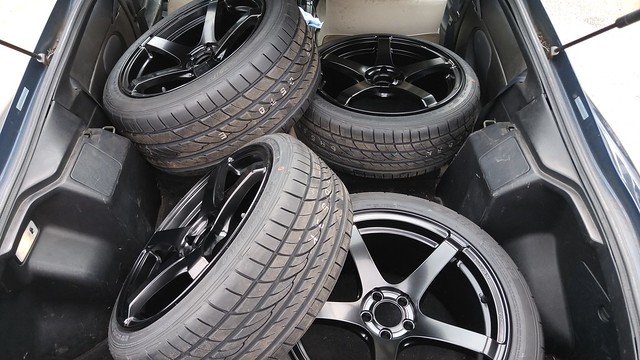 20160309_131847
 by
Tim Robbins, on Flickr
Re: liqorboxracing 03 Base Model Vibe in Abyss
Posted: Thu Mar 10, 2016 6:57 pm
by lannvouivre
Those rack delete covers are really awesome. I want to buy some (Duraflex makes them), but the job market down here is still really freaking horrible.
Re: liqorboxracing 03 Base Model Vibe in Abyss
Posted: Sun Mar 13, 2016 3:06 pm
by vibenvy
Those wheels look great! Can't beat a good ole 5-spoke wheel! Now hurry up and get them on
!
Re: liqorboxracing 03 Base Model Vibe in Abyss
Posted: Sun Mar 13, 2016 5:51 pm
by liquorboxracing
vibenvy wrote:Those wheels look great! Can't beat a good ole 5-spoke wheel! Now hurry up and get them on
!
I know! I love my Enkei rims, but I had to send the front tires back. I didn't like how the 215/40 R18's looked on the front rims, so I'm sending them back and exchanging them for 225/40 R18's. The 225's have an 8.1" tread width and a 9.1" section width where the 215's had only 7.5 tread width and 8.5" section width. Plus the 225's are a touch taller at 25.1" tall. They should round out and fit the rim a lot better and also fill up the wheel well a bit more. Should have my 225's by Wednesday and have them mounted by Friday. Still waiting on my engine parts to get back from powder coat as well.

I'll post pics next weekend.
Re: liqorboxracing 03 Base Model Vibe in Abyss
Posted: Sat Mar 19, 2016 9:07 am
by liquorboxracing
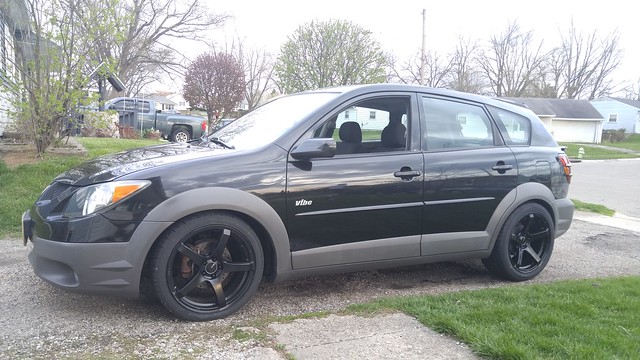
Wheels are on!
 20160318_182412
 by
Tim Robbins, on Flickr
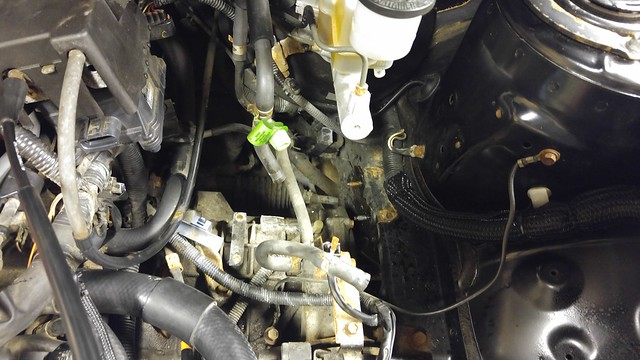
I should have my engine parts back from powder coat today, so I will slowly be putting my engine bay back together this week. I have some a few pieces I need to fabricate after I get my valve cover and intake back on. I have been cleaning and detailing everything I can get to and/or remove in my engine bay. So I hope to have it looking fairly decent for the cruising season when it starts next month.
 20160316_202625
 by
Tim Robbins, on Flickr
 20160316_202706
 by
Tim Robbins, on Flickr
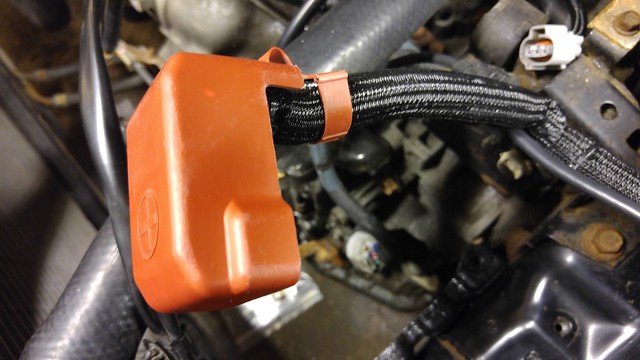
I'm re-covering about 80% of the wiring harness in the engine bay getting rid of, or covering up the old plastic wire loom covering. Hopping it will freshen things up a bit in the engine bay.
Re: liqorboxracing 03 Base Model Vibe in Abyss
Posted: Sat Mar 19, 2016 2:13 pm
by vibenvy
Wheels look awesome! Now I'm excited to see the engine compartment all buttoned up
!
Re: liqorboxracing 03 Base Model Vibe in Abyss
Posted: Sun Mar 20, 2016 5:44 pm
by liquorboxracing
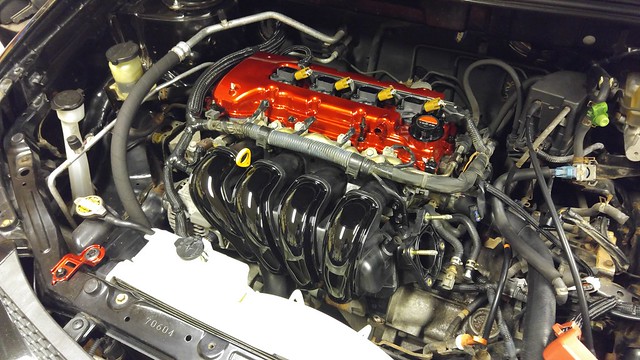
Parts came back from powder coat yesterday and I had a chance to start putting some of the engine back together. Never seizes to amaze me how one shiny clean and new part next to an old one really makes the old one look very bad. So I wound up removing more brackets to repaint and clean parts, wires, and hoses on them. I also need to start making patterns for the covers I need to make.
 20160319_172309
 by
Tim Robbins, on Flickr
 20160320_140115
 by
Tim Robbins, on Flickr
 20160320_154543
 by
Tim Robbins, on Flickr
 20160320_195904
 by
Tim Robbins, on Flickr
 20160320_200743
 by
Tim Robbins, on Flickr
Re: liqorboxracing 03 Base Model Vibe in Abyss
Posted: Wed Mar 23, 2016 6:57 pm
by liquorboxracing
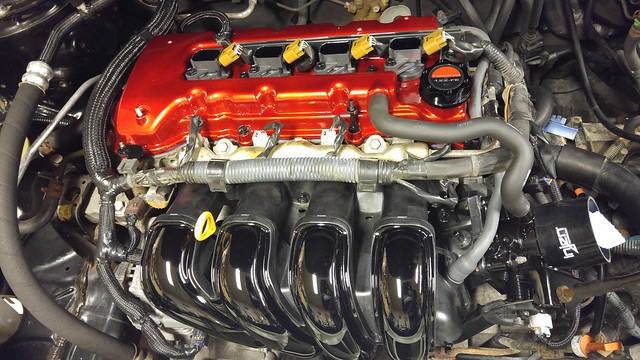
With the valve cover, intake, and throttle body back on I could now start laying out and making my new engine cover. Well, ok, I'm not really wanting to cover the whole engine. I just want to cover the unsightly area between the valve cover and the turn downs of the intake runners where the fuel rail and EMS wiring harness are. SO I grabbed some poster board and began making my template.
 20160321_193523_HDR
 by
Tim Robbins, on Flickr
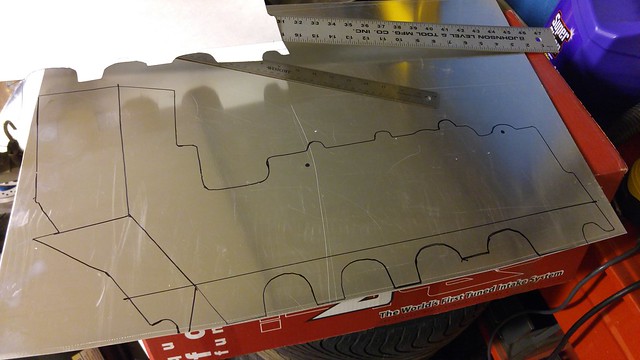
Transferred template to 18 gauge aluminum, and got it ready to cut out.
 20160321_204544
 by
Tim Robbins, on Flickr
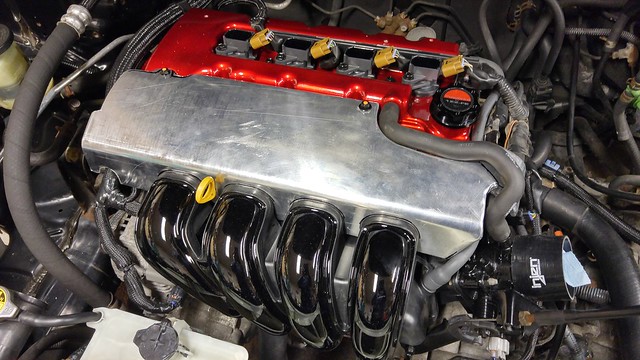
Once it was on the aluminum it looked massive. So I decided to trim some of the fat off of it. Once I had it all laid out, including areas for flanges, I cut it out and began trimming it to first fit the intake. I took it to work and formed the radius bend on the Magnetic brake. I then rolled the contour from the radius bend back at home on my slip roll. I located the mount holes and drilled them, then carefully trimmed it to fit nice and tight, formed the rear flange, and fitted it in place.
 20160322_202126_HDR
 by
Tim Robbins, on Flickr
Next I formed out an area for the vent hose from the valve cover to the throttle body to lay in, then radius formed flanges along the perimeter of the entire cover.
 20160322_212029_HDR
 by
Tim Robbins, on Flickr
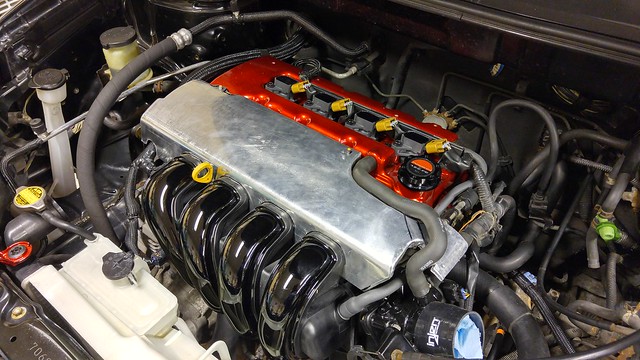
Next I laid out the center line where I will drill and form some dimpled holes, which I did on my lunch hour at work today. I also cut and formed a section of mesh screen to fit behind the dimpled holes so you still could'nt see the fuel rail and wiring harness.
 20160322_220339_HDR
 by
Tim Robbins, on Flickr
And a couple with the dimpled/flared holes and screen in it.
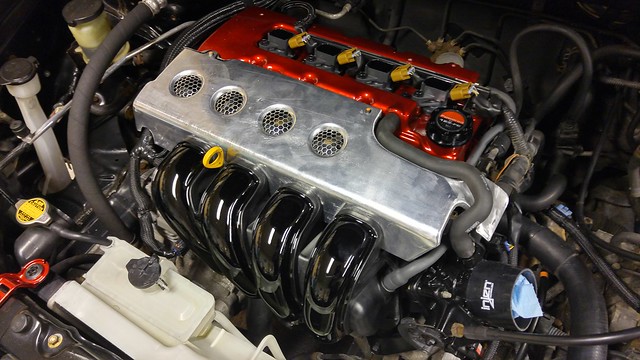 20160323_183805_HDR
 by
Tim Robbins, on Flickr
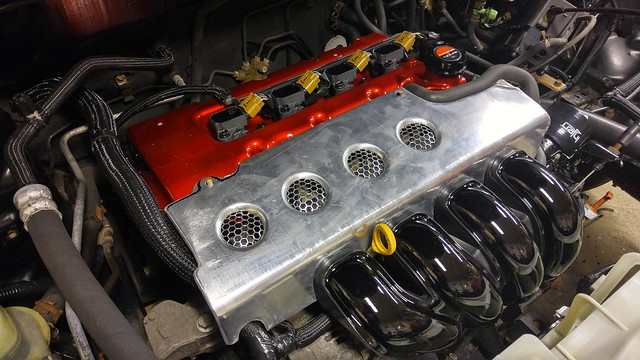 20160323_183818_HDR
 by
Tim Robbins, on Flickr
Re: liqorboxracing 03 Base Model Vibe in Abyss
Posted: Wed Mar 23, 2016 7:42 pm
by tpollauf
Awesome metal work there Tim
18 gauge is not very thick for a cover. Did you TIG weld any ends/corners? Will this piece be Anodized? Will it stay the natural aluminum color? Sharp looking no matter what
Re: liqorboxracing 03 Base Model Vibe in Abyss
Posted: Thu Mar 24, 2016 5:26 pm
by liquorboxracing
tpollauf wrote:Awesome metal work there Tim
18 gauge is not very thick for a cover. Did you TIG weld any ends/corners? Will this piece be Anodized? Will it stay the natural aluminum color? Sharp looking no matter what
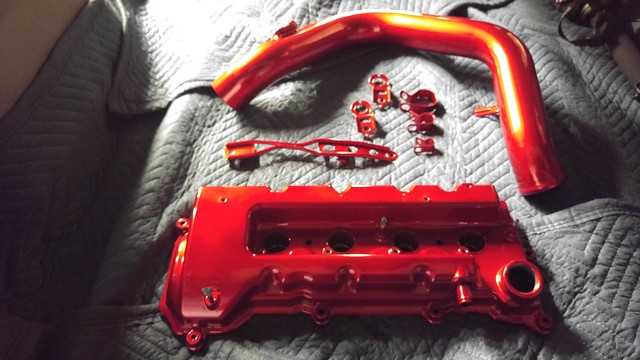
Thanks tpollauf! The cover has no welds anywhere, it's one single piece of 3000 series 18 gauge aluminum. The cover will be painted gloss black, and the mesh will either be satin black or left natural in color. I'm leaning towards satin black, but I'm not 100% yet. I'll be making a couple other aluminum pieces for the engine bay in the future. For now just want to get the car drivable before cruising season starts.
Re: liqorboxracing 03 Base Model Vibe in Abyss
Posted: Fri Mar 25, 2016 10:01 am
by vibenvy
Wow, the engine is coming together really nicely! Are the powder coated parts orange or red?
Re: liqorboxracing 03 Base Model Vibe in Abyss
Posted: Fri Mar 25, 2016 3:08 pm
by liquorboxracing
They are candy red. I noticed that they look a tad on the orange side in a few of the pics, but they are candy red. Almost look like an anodized red.
Re: liqorboxracing 03 Base Model Vibe in Abyss
Posted: Fri Mar 25, 2016 4:01 pm
by vibenvy
I kind of figured they were probably red.
Re: liqorboxracing 03 Base Model Vibe in Abyss
Posted: Sun Mar 27, 2016 5:46 pm
by liquorboxracing
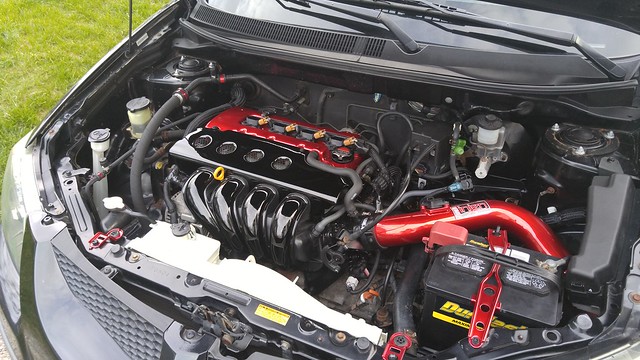
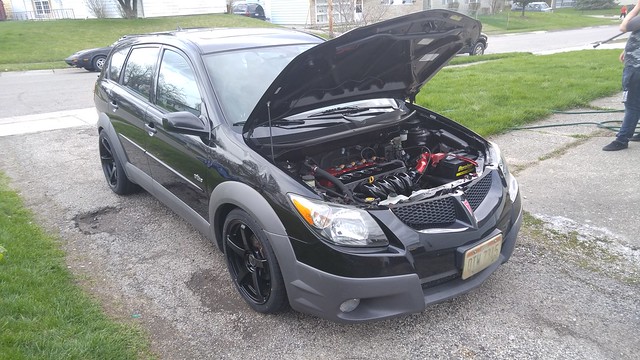
I got the Vibe running again tonight. Still have a few things I need to work on, and fix before she's totally road worthy, but it felt good hearing her running again. In fact she's running much better than she was before doing all this work. Here's a few pics from when I had her out today.
 20160327_191013
 by
Tim Robbins, on Flickr
 20160327_191117
 by
Tim Robbins, on Flickr
 20160327_191125
 by
Tim Robbins, on Flickr
 20160327_191148
 by
Tim Robbins, on Flickr
Re: liqorboxracing 03 Base Model Vibe in Abyss
Posted: Mon Mar 28, 2016 2:12 pm
by handmedown03
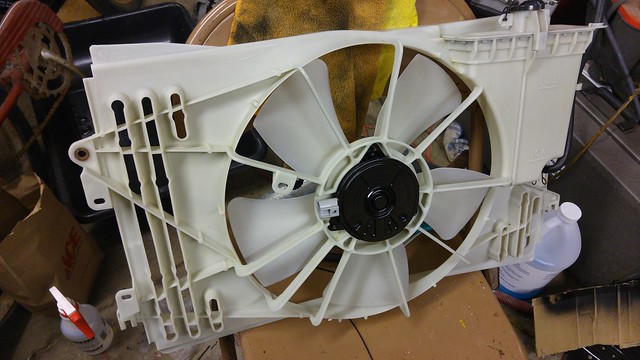
Nice work on the motor! I like the more exposed look. I have always liked a detailed mechanical look to a engine over streamlined flash. Nice to have access to the metal working tools it took to make that cover. Can't believe you resisted the urge to paint that fan shroud. Bugs the crap out of me to see that big white thing everytime I open the hood. If I get the time, mine will be black. Like the wheel/tire combo also but not sure mine would have the power to turn them.
Re: liqorboxracing 03 Base Model Vibe in Abyss
Posted: Mon Mar 28, 2016 7:07 pm
by liquorboxracing
handmedown03 wrote: Can't believe you resisted the urge to paint that fan shroud. Bugs the crap out of me to see that big white thing everytime I open the hood. If I get the time, mine will be black.
I completely agree with you handmedown03!! I really hate the way it looks as well. It was very difficult not to paint the shroud black when I had it off. I had a good lengthy discussion with my boss about painting it and we were both worried about adhesion of the paint especially on the very hard to reach nooks and crevices that could not be thoroughly prepped for painting. I decided that instead of wasting my time and money on the plastic shroud, that I would instead buy an aftermarket electric cooling fan and make an aluminum shroud to mount it to the either the factory radiator or an aftermarket all aluminum dual core rad. For now I am going to have to live with the big white ugly shroud though.
Re: liqorboxracing 03 Base Model Vibe in Abyss
Posted: Tue Mar 29, 2016 5:07 pm
by vibenvy
Wheels and engine look great
! I can't wait to see it in person in Nashville!
Re: liqorboxracing 03 Base Model Vibe in Abyss
Posted: Wed Mar 30, 2016 2:28 pm
by handmedown03
Really something in aluminum or black plastic would be better. I agree with you on the kind of plastic that shroud is made off. It is one of those that could or could not hold paint. I will probably degrease, scuff with a red skotchbrite and sanding paste, shoot it with Bulldog adhesion promoter and shoot some Fusion on it. Got me some Sickspeed allen head bolts and red washers today in the mail for my engine bay. Now I need time.

Re: liqorboxracing 03 Base Model Vibe in Abyss
Posted: Fri Apr 01, 2016 1:10 am
by lannvouivre
What size did you get? I have always wanted to order some, but never really checked any of the ones in the Vibe to see what sizes they are.
Re: liqorboxracing 03 Base Model Vibe in Abyss
Posted: Fri Apr 01, 2016 6:52 am
by Rayven01
I am generally not a fan of people painting engine bay parts flashy colors but that is well-designed, tasteful and looks slick. Well done!