Page 1 of 1
Whoopsy wheel stud. :(
Posted: Mon May 09, 2011 12:05 pm
by vibedrivermatt
Today I decided remove my steel wheels so I could put on my alloy wheels with summer tires. Everything started fine until I attempted to loosen the first lug nut. I used the lug wrench in my hatch and figured out its a bad idea to jump up and down on the lug wrench to remove the lug nut. I broke a wheel stud. A breaker bar got all the other lug nuts off without any trouble. Anyways guess this has to get fixed now, I see theres plenty other threads on this already but thought I'd share my happy experience. I have provided photographic evidence for entertainment purposes.
Posted: Mon May 09, 2011 12:56 pm
by Old Tele man
...that happens....the broken stud can be pressed out using a hydraulic press stand (or local machine shop) and new stud pressed back in (although it can be "pulled" into place using a sacrificial nut and a stack of washers).
Re: Whoopsy wheel stud. :( (vibedrivermatt)
Posted: Mon May 09, 2011 9:08 pm
by keithvibe
Dummy. What have you learned? Sudden impact and high amounts of force will break a wheel stud
Re: Whoopsy wheel stud. :( (keithvibe)
Posted: Mon May 09, 2011 9:39 pm
by vibedrivermatt
Quote, originally posted by Old Tele man »...that happens....the broken stud can be pressed out using a hydraulic press stand (or local machine shop) and new stud pressed back in (although it can be "pulled" into place using a sacrificial nut and a stack of washers).Thanks for the info. Yup right now I doing a bit of research on how to fix this. I've already got the nut and stack of washers. Theres just a few more things I'm after before I can get started. It looks like I'll be doing a do it yourself job. Quote, originally posted by keithvibe »Dummy. What have you learned? Sudden impact and high amounts of force will break a wheel studwell yeah, but instead of sudden impact and stuff I like to refer to it as jumping up and down motion. But I guess all those complicated technical terms describe it just as well.
Re: Whoopsy wheel stud. :( (vibedrivermatt)
Posted: Mon May 09, 2011 9:54 pm
by keithvibe
Lol
Posted: Mon May 09, 2011 10:26 pm
by Salsa Guy
Been there!
Re: Whoopsy wheel stud. :( (keithvibe)
Posted: Wed May 11, 2011 8:54 am
by vibenvy
That sucks Matt .
Posted: Wed May 11, 2011 3:07 pm
by Kincaid
Sorry to hear this! In college I drove around on three good studs in my Triumph for months before my wheel fell off.
Re: (Kincaid)
Posted: Wed May 11, 2011 9:39 pm
by Wolfman213
Quote, originally posted by Kincaid »In college I drove around on three good studs in my Triumph for months before my wheel fell off.Now that's some funny shat right there lol
Re: Whoopsy wheel stud. :( (vibedrivermatt)
Posted: Thu May 12, 2011 1:15 am
by Entelodont
WD 40, PB B'laster, or any penetrating oil and some light tapping on the lug nuts does wonders for rusted studs. Head to Harbor Freight and get a $20 torque wrench, it'll help prevent over tightening. Busted studs aren't the most fun work projects.
Re: Whoopsy wheel stud. :( (Entelodont)
Posted: Thu May 12, 2011 3:30 am
by vibedrivermatt
Quote, originally posted by Entelodont »WD 40, PB B'laster, or any penetrating oil and some light tapping on the lug nuts does wonders for rusted studs. Head to Harbor Freight and get a $20 torque wrench, it'll help prevent over tightening. Busted studs aren't the most fun work projects. The funny thing is I do torque the lugs down with a nice electronic torque wrench. I think the real reason the stud broke is because of plain old messing up on my part. Oh well. Thanks for the suggestions I may try that!
Re: Whoopsy wheel stud. :( (vibedrivermatt)
Posted: Sat May 21, 2011 4:48 am
by vibedrivermatt
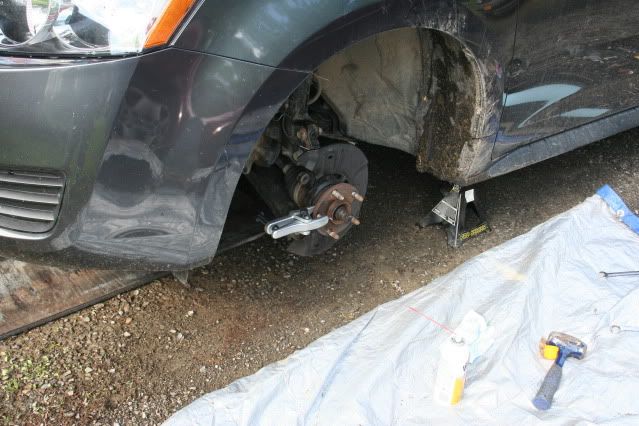
Please keep in mind I'm not a professional mechanic or an auto mechanic. I'm a DIY'er who has taken some pictures to show how I did this repair. I also used jack stands as a safety measure.
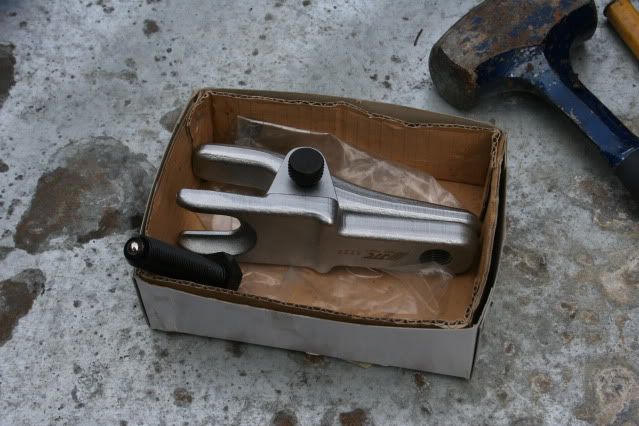
I finally got around to fixing the wheel stud today on my 2009 vibe. I was waiting for this to come in the mail. Its a universal ball joint separator. It was $30 on ebay which seemed like a good deal. I used this to press out the broken stud. This tool seemed like a better method than hitting it with a hammer. The main thing I was looking for when getting this was to make sure it had a 19 mm opening for the stud to press though.
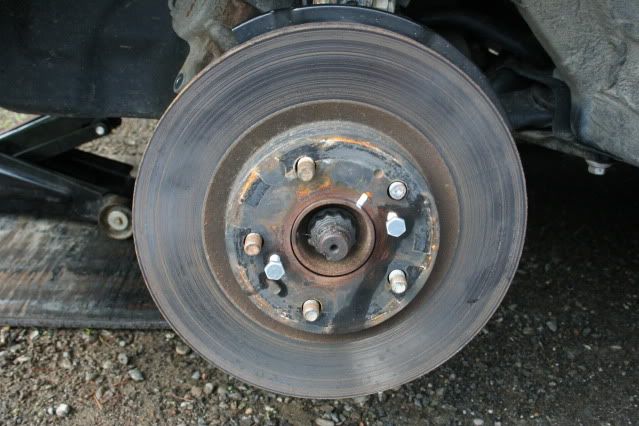
Im doing a little fast forward to this point where the caliper and the caliper bracket have been removed. I squirted some liquid wrench in the holes on the rotor and popped it off with two appropriate sized bolts. The exact size of those escapes me at the moment but I believe they are 1/4" diameter at the threads. Also, some marks were made on the rotor with a white enamel paint marker so I could remember which way to put it back on. Some people prefer to make matchmarks by putting scratches on the metal instead of paint. Vibes of other model years may not have these holes for removing the rotor.
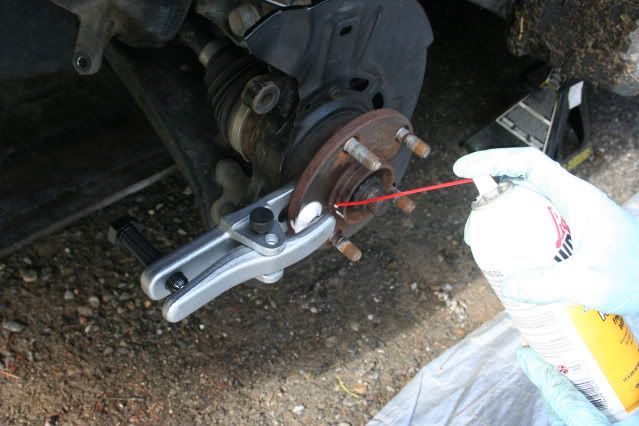
The ball joint separator was used and so was a generous blast of liquid wrench. the tool worked really well.
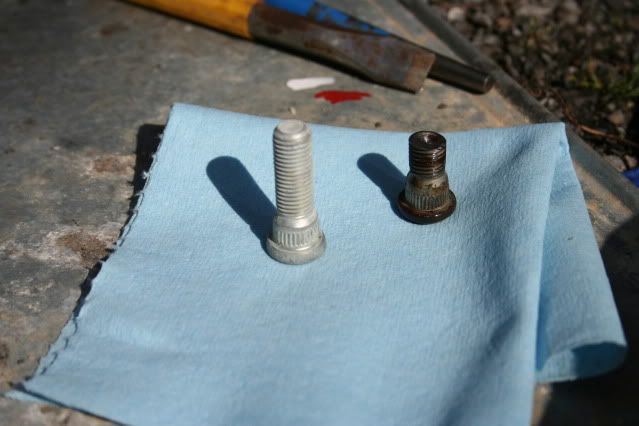
the new stud is frosty because I've been keeping it in the freezer.New stud in and ready to go, I had it in the freezer because this is supposed to shrink it a bit and help it get pressed in.
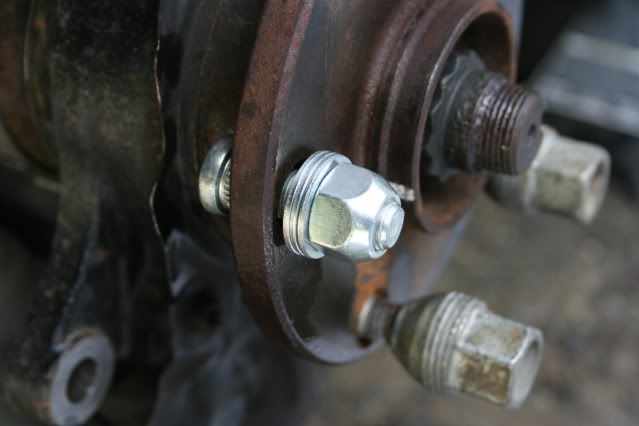
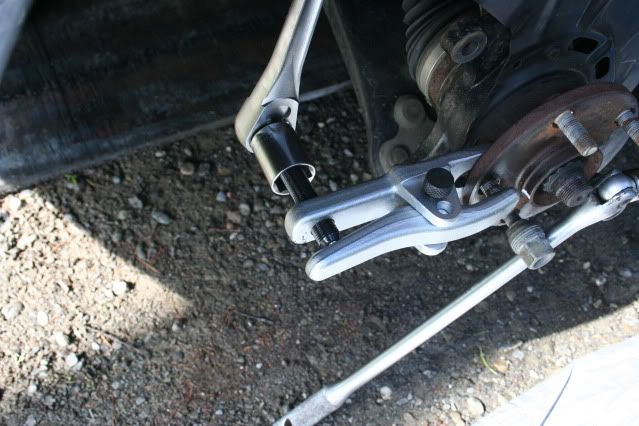
Here is the sacrificial nut and set of washers that were used to press the new stud in. The nut was used with the flat part against the washers. The stud and the hole also got a generous blast of liquid wrench before starting. I had to find something to hold the hub while tightening the lug. In my case that ended up being the jack handle, also I threw on some wheel lugs to protect the other studs that were being used to prevent it from spinning.
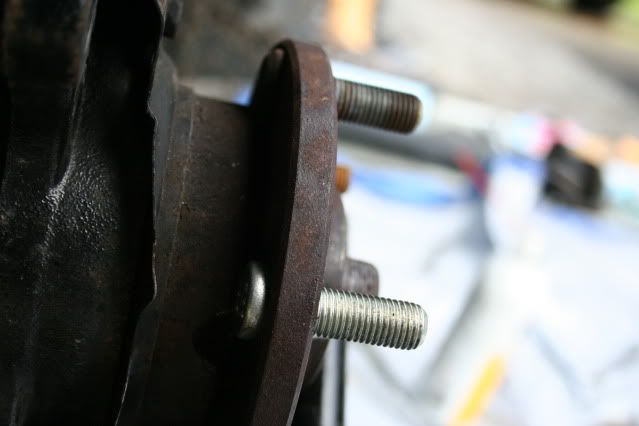
I stopped when the end of the stud appeared to be flush to the back of the hub.
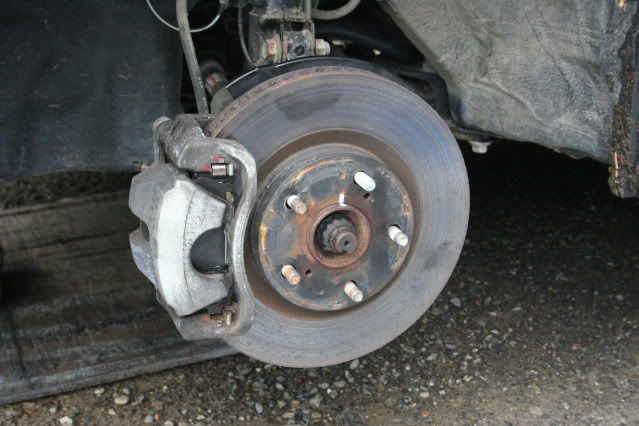
So that's the gist of it! The caliper was put back together and torqued to spec. All the liquid wrench that was getting on the studs and rotor was cleaned off using some cleaner. Also I had to pump the brakes before going anywhere to compress the caliper back because it was compressed using a 6" C-clamp and then taken apart to get the rotor off. The method of doing this is to basically, keep pumping the pedal until you get resistance back but don't let the pedal ride to the floor. Thanks for all the feedback and info from all the genvibers on this thread.I also had some very good help from Nathan McCullough's expert village youtube videos. His videos are pretty good you might wanna check out a few. The torque specs and some of the general techniques to do this were from the 09 vibe s-car service manuals.
Re: Whoopsy wheel stud. :( (vibedrivermatt)
Posted: Wed May 25, 2011 11:39 am
by dragon64
Breaking studs on any Toyota made products is a pretty common. I've actually broke a stude on a 2011 RAV4 with a torque wrench at about 80ft/lbs recently. not the first time in 20 some odd years probably not the last time either.
Re: Whoopsy wheel stud. :( (dragon64)
Posted: Thu May 26, 2011 3:41 am
by vibedrivermatt
Quote, originally posted by dragon64 »Breaking studs on any Toyota made products is a pretty common. I've actually broke a stude on a 2011 RAV4 with a torque wrench at about 80ft/lbs recently. not the first time in 20 some odd years probably not the last time either. ha thats pretty funny. dang what the heck is toyota making these studs out of?
Re: Whoopsy wheel stud. :( (vibedrivermatt)
Posted: Thu May 26, 2011 4:34 am
by bodhi_tree777
ahh, that's a pain. Thanks for the detailed fix info, by the way. That jack's not the only thing holding the car up, is it?
Re: Whoopsy wheel stud. :( (bodhi_tree777)
Posted: Thu May 26, 2011 11:29 pm
by vibedrivermatt
bodhi_tree777 wrote:ahh, that's a pain. Thanks for the detailed fix info, by the way. That jack's not the only thing holding the car up, is it?
Oh no, no, the whole job was done on jackstands. I just have the jack just barely touching the front floor jack lift point as a little extra safety measure. Most if not all of the front is the car is being held by the stands. Thanks the reminder.
Re: Whoopsy wheel stud. :( (vibedrivermatt)
Posted: Fri May 27, 2011 1:48 am
by Entelodont
Nice tutorial, and the pics help to inform. Is that a brass mallet? A lot of DIY'ers are lacking the proper tools, not the case here.
Re: Whoopsy wheel stud. :( (Entelodont)
Posted: Mon Oct 31, 2011 1:03 pm
by vibedrivermatt
Quote, originally posted by Entelodont »Nice tutorial, and the pics help to inform. Is that a brass mallet? A lot of DIY'ers are lacking the proper tools, not the case here.
Thats actually an ESTWING steel hammer that belongs to my dad. I was happy to learn its a made in USA tool. I'd always thought it was a cheap Kobalt tool from lowes. It turns out thats not the case.
 http://estwing.com/product.php?product_id=10400
" onclick="window.open(this.href);return false;
But the main reason I've reviving this thread is because I DID IT AGAIN!! :/I broke another stud! It happened again when I was changing wheels. This time I broke one when trying to tighten down one of the lugs instead of removing it. Guess that stud has to get fix too now.
Posted: Tue Nov 01, 2011 4:57 am
by 09Vibe
Assume these things have plenty of anti-seize on the threads? I've been using an impact gun to change out mine (not for final torque of course) and have never had this happen the last 4 times. But I'll be paying closer attention now!!!
Re: (09Vibe)
Posted: Tue Nov 01, 2011 6:55 am
by vibedrivermatt
oh I dont put anti-seize on the threads. how I broke the second stud is pretty goofy like how the the first one was broke. I was getting tired trying to tighten the lugs down with a ratcheting wrench so I decided to put a long cheater pipe on it to make the tightening easier/faster. This broke the stud way fast. Doh! I can see how an impact gun could really make light work of getting those lugs tight. After I broke the stud I used a wire brush to remove some of the rust on the studs this helped some. But, using any kind of lube on studs goes against what I been hearing is good to do.
Re: (vibedrivermatt)
Posted: Tue Nov 01, 2011 7:49 am
by kramer
i realy like how you multi purpose that tool i now want one have to buy a nother rollaway to put it in lol i usually just use a hamer and punch but i like that tool