After initially reading this problem like 3 years ago, I knocked on wood since my knobs were going very well and no signs would point that they would fail. I considered myself lucky!
Last week, I left for work and wanted to adjust the bass a little bit and noticed that the right knob was stiff. So I played/wiggled with it a little, spinning it fast so it would become "loose" instead of stiff... (I don't know why it was stiff in the first place... maybe a broken plastic piece was creating the issue...). I rarely use this knob. It's only for time change (twice a year...) and for slight EQ settings, mostly for more or less bass...
So while spinning the knob fast, I noticed the knob was now spinning way too freely... and I said to myself: OH NO, DAMN. I pulled over and looked at the problem closer: the knob was now all wiggly and wouldn't catch 80% of the time when spinning it... I knew what was going on.
So I came back here to look for the thread that was talking about the volume knob and found this tutorial. I read all the steps, so I knew what I was up against. THANKS a lot to
DULUTHVIBE2009 for the initial post!
I called my local GM CHEVROLET dealer to ask about the knob... and they had ONE in stock... at the price of 13.95$ (canadian). What a rip-off! It reminded me of the Pontiac center wheel caps that falls off... and buying them at the dealer is something like 35$ a piece!!!
So I told the guy to put it aside for me so I could pick it up during the week-end. In the meantime, I would strip off the radio and see what could be done... and if I could fix it without buying this stupid 15$ knob!
Took it appart, dash is easily removed (snapped), then 4 10mm bolts. The rightmost ones are a little bit scary because I didn't want to lose them in the dash when removing then (my ratchet isn't magnetic). Got the radio out, removed the 2 plugs plus the antenna connector, brought the radio inside.
I then removed the 4 golden hex screws (5/16 if I can recall?). My metric buckets wouldn't do the trick, too loose or too tight.
Then the real challenge came... The 12 tiny hex screws are very, very, VERY small. I had small hex buckets, but not that small. I tried using small long nosed vice-grips, but even if It had a strong grip on the screw, it would kind of slip off and I was too scared to scratch the circuit board and cause a misfunction... (something similar already happened to me). So I decided to look online at Canadian Tire and any other hardware shops so I could find really small buckets and I did find a kit at Canadian Tire... they had like 2.5mm, 3.0mm, 3.5mm, 4.0mm... So I went out and bought it (it was 40$ but 50% rebate, so 20$ isn't a bad deal... 66 bits were included, torx, triangle, etc.). I came back home with the kit, super happy that I would have the proper tool for the job... Took the 3.0mm out: TOO SMALL. Okay, I'll use the 3.5mm then! ... TOO LARGE !?!?!? COME ON! So these screws must be imperial and not metric... just like the 4 golden ones on the sides, they were using the imperial system.
So I had to "grind" the 3.0mm bit... I inserted the nose of small long nosed pliers so I could grind the interior... and it worked! I had grip on the screws now! But as I was advancing in the job, the 3.0mm bit would become more and more loose and worn out... the final 2 screws were a pain in the așș, still managed to take them out. The hard part was done but what about AFTER? When I had to screw them back in!!... Joy joy... JOY.
So I took off the knobs, obviously the right knob was damaged, a plastic piece was missing and wouldn't be found. The left one was good prior to disassembling the radio, but the LEFT konb mut have suffered a trauma since a crack was noticable... after putting it back on the shaft, the plastic cracked and a chip of plastic was hanging... still in place, but 2 cracks appeared and the plastic piece was wiggling. I now had to fix this too!
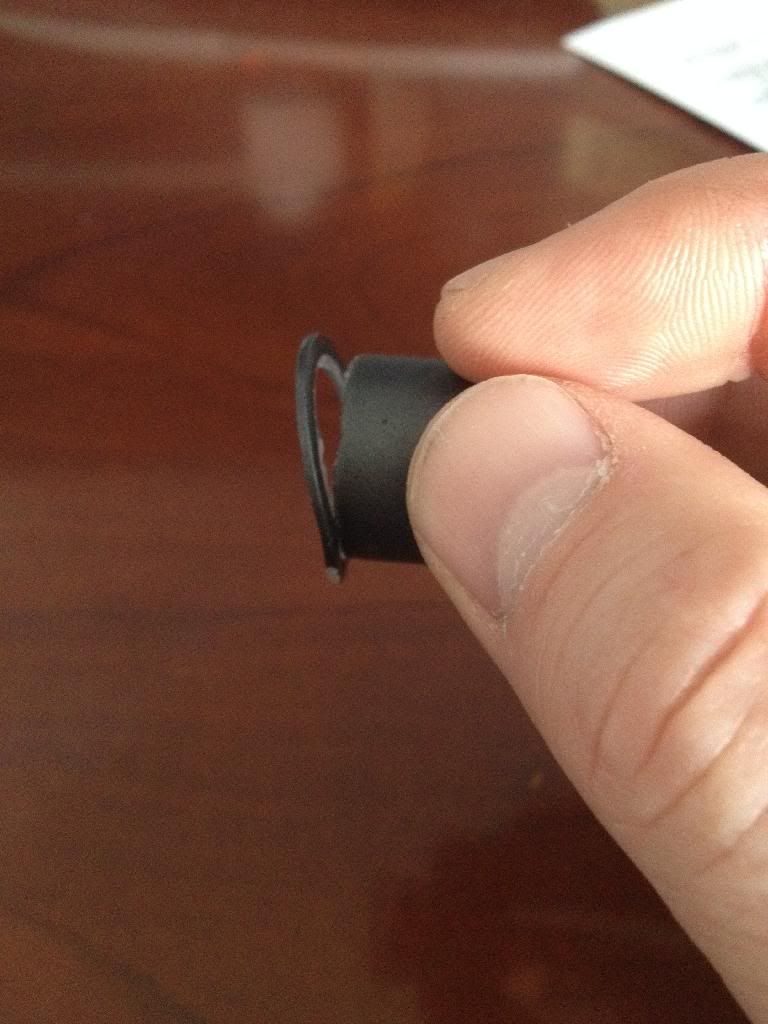
"KRAGLE", show me your power! (Krazy Glue, The Lego Movie reference (KRAzy GLuE)). So I managed to glue the newly cracked left/volume knob. But I knew it would break again, so like another fellow said on the thread, EPOXY is a great thing and saved me many problems in the past. It's a good way to bond and solidify things. BUT, instead of gluing the knobs to the radio metal shafts, I decided to just give the knobs more strength. I coated the exterior of the broken plastic cavity, all around, to create a palstic-like coating that would strengthen this cheap plastic. The metal pre-shaped black metal ring that sits on the metal shaft, I inserted it in the plastic cavity so I'd be sure it would still fit after the fix. I let the epoxy cure overnight. The trick to being able to handle the epoxy well and not have it to drip everywhere, is to mix it (resin and hardener) and wait a little bit for the consistency to become more tacky than runny. If it's too runny (freshly mixed), it will drip down and not stay in place. Most epoxies (in popular hardware stores) are 5 minutes (time it takes for the stuff to become set after being mix). You only have a small window of time to use your mix. So a piece of advice: Mix small batches! Work with small batches, else you will lose your epoxy. Mix a little bit, wait a little for the best handling consistency, and then apply generously all over.
See picture of epoxied knobs:

In the morning, everything was set and hard! The job was a success. I reinstalled the knobs on the radio and everyhing stayed put, no cracks appeared, nothing broke. The knobs were spinning very straight and did their job as new ones would! But they're not new... they're BETTER THAN NEW!
The last problem (that I thought) was about putting back the 12 screws... But it didn't take me 2 minutes and I had a solution: HACK SAW. If HEX wouldn't do it, SLOT would! I took every screws to the workbench and inserted them in the vice and made a little slot in each screws' heads. It worked 100% great! Now I have 12 flat-style screws instead of unscrewable HEX ones

See picture of slotted hex screw:

That was it. My fix had work and the easy part was to put the radio back into the dash. Since I was scared to lose one of the 4 big 10mm bolts hooking the radio to the frame, I decided to use "blue tacky putty" inside my 10mm bucket so the screw would stay attached to my tool. Did the trick. I reconnected every wires, put the dash panel back... start the car and... SURPRISE (ANOTHER problem...). The AIRBAG light would stay lit in the instruments panel... and nothing would light up on the passenger airbag display (AIRBAG ON, AIRBAG OFF...). Uh oh...
I went back inside the house to Google the issue but nothing relevant would come up, except one thread saying that after someone replaced a HEAD UNIT (the radio itself...), the light came on, and then a little while after, it did come off by itself and stayed off. I went back outside, removed the radio to check if a wire was caught and disconnected, but nothing is really close to the radio. So I put back the dash panel and reconnected the passenger AIRBAG display. I started the car again: light still on. I decided that I could "reboot" the computer of the car... by unplugging the 2 very large connectors (under the hood, near the fuse box, on its left). If this wouldn't work, the negative battery connection was the last resort.
When I tried the car again, the AIRBAG LIGHT WAS OFF! Victory! I don't know what happened, it was probably due to the passenger's airbag display being disconnected... I don't know. Now everything works like it did originally. Pfew.
The radio now works very well, and the lighted areas on the knobs are still 100% lighted. My epoxy job isn't as "drastic" as the other I read about. Most epoxy are drying CLEAR, but they will still reduce the light going through. So epoxying the knobs to the radio's metal shaft if very drastic!
I hope my "little" story will add knowledges to this thread, for future fixer-uppers who will try to fix their knobs. Anything can happen when we mess around with things, and nobody mentionned they had troubles with the SRS AIRBAG light so I wanted to share my whole adventure fixing those knobs.
Hoping it helps someone else!
- Bottom line... Don't bother buying a mini-hex-screws tool, especially in metric... they don't work. But if you wish, look for an imperial kit, but good luck.
(At this point, I don't know what's the best way to remove those screws... But if you use vice-grips, be very careful because even if it's well clamped to the screw, it could slide off... and hit a critical part on the circuit board and have a dramatic turn of event. I strongly suggest putting masking tape around the areas of each screws so if a slip occurs, you will have something to tamper the hit with.)
- I strongly suggest hacksawing the screws after their removal so it's easier to reassemble and to disassemble in the future).
- Maybe disconnecting the negative pole on the battery while doing the job would have prevented the AIRBAG light to come ON...?
- Epoxy is a good ally, learn how to use it and discover what it has to offer!
Thanks for reading!


