Materials used:
Ajax degreaser dish soap/bucket of water
Air powered sander
12mm socket and 3/8 drive
Flat blade and Philips head screwdrivers
Krylon Satin Black Covermax spray paint (2cans)
Krylon Satin Covermax spray clearcoat (1can)
2 saw horses
Blue painter's tape
Utility knife
Newspaper
Large Sheets of Cardboard

Step 1: Get tools set up!
The preliminary things I did:
Use 12mm socket to remove the 4 bolts securing hood to hinges, disconnect windshield washer lines from sprayers on hood, remove hood and set on saw horses, washed hood with soapy water (ajax), and finally carefully use flat bladed screw driver to pry washer nozzles from top of hood. I then used blue painters tape to make the boundary where I would be painting (ie the top of the ridges on the hood.) Then turned on my compressor and hooked up the sander! I do not remember the grain of the sand paper, but can fetch that for those who need to know!

Step 2: Sand down the hood!
I used the air sander to go in circles around the center of the hood and sand off a few layers of the factory paint, scuffing it to receive the new paint! The bare metal patch you see was a series of dents that I pounded back out, then sanded to metal because they were showing rust.

The car with no hood lol Looks to be a lot of room for a turbo

Step 3: Wash sanded hood!
Now that the hood was sanded down I washed it with soapy water again, then rinsed with the hose and let sun dry. This removes all dust and grease to allow the paint to stick!

Step 3.5: Don't make mistakes, unless you have touchup paint!
I was done sanding, almost put my sander down and saw a rust spot in the paint outside the area I intended to sand..... so instinctively I pulled the trigger and sanded the rust spot.... on the grey paint. Well, now I'll be buying a can of Shadow touchup from my dealer to make sure those spots don't rust lol

Step 4: Painting the grill area!
I used a flat head screw drive and phillips head screw driver to remove the 5 or so snaps and screws that held in the honeycombs in the grill. I then taped off the lip of the grill with painters tape. After I had the lip taped I used more painters tape to secure the newspaper to catch over spray as well as a large piece of cardboard to cover the engine bay. I would actually suggest a bed sheet, but I didn't have one handy to use. It would have made life a whole lot easier! Also used painters taped to cover the pontiac emblem, and the utility knife to cut out the tape to only be on the emblem.

Step 5: Painting!!
I used rattle cans, which suck to paint with but were the paint that matches my body paint. I applied coat 1 on the hood working left to right, coat 2 up and down, coat 3 left to right, and coat 4 up and down then left to right lightly on both takes.
For the nose I moved from left to right and applied coats 1 thru 3 the same way. Coat 4 was light and all over; just a dusting!
Clearcoat was applied in the exact same way on both, 4 coats each!

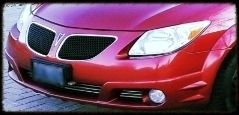
The finished product!!
I apologize for the dust looking hood. I still need to wet sand it and buff it, but ran out of time for the day! I tried wiping it off, but it need washed pretty good or maybe a coat or 2 more of clearcoat!