How To: Cupholder LED Mod

Stereo, security systems, vehicle electronics, and electrical-related discussions
Post Reply
MrHatchWagon
Posts: 443
Joined: Wed Dec 07, 2011 12:14 am
Location: Bathurst, NB

How To: Cupholder LED Mod

Post by MrHatchWagon »

This is a short guide on how to put LED's in the cupholders.

First of all, you have to remove the armrest assembly. It's simply held in place by 4 10mm bolts, one in each corner of the assembly. That is to say, there are two under the piece of felt in the front tray, ahead of the cupholders. The other two are in the console, under the felt bottom piece. Once you pull it out, you'l see they're pretty simple to access with a socket driver and an extension.

Make sure your e-brake is pulled up, and then lift up the back end of the armrest to expose the 12v connector. Unplug this and take the armrest assembly out of the car.

Image

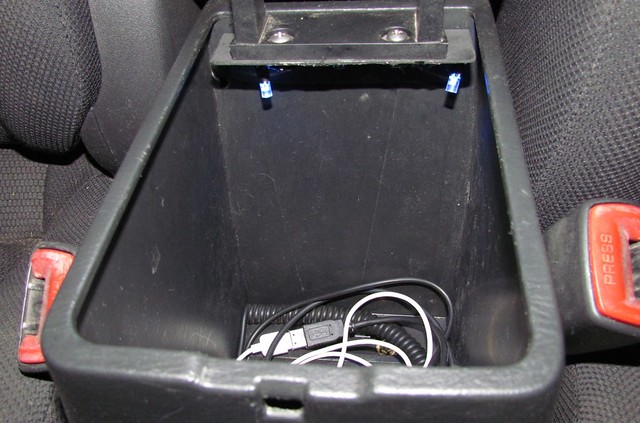
After this is done, you can take a drill to the middle of both cupholders. I had 5mm LED's with supplied mounting clips, so I drilled a 1/4'' hole first, and then widened it a bit by going up to the next sized bit. Test your LEDs' fitment on something unimportant first, your results may vary.

This is what it will look like. Note that I had one LED already in place, and had just drilled the second hole.

Image
Image

Both in place:
Image
Image

After your LEDs are in, secure them with some silicone on the inside of the cupholder. This will not only glue them into place, it will prevent water from getting into your wiring.

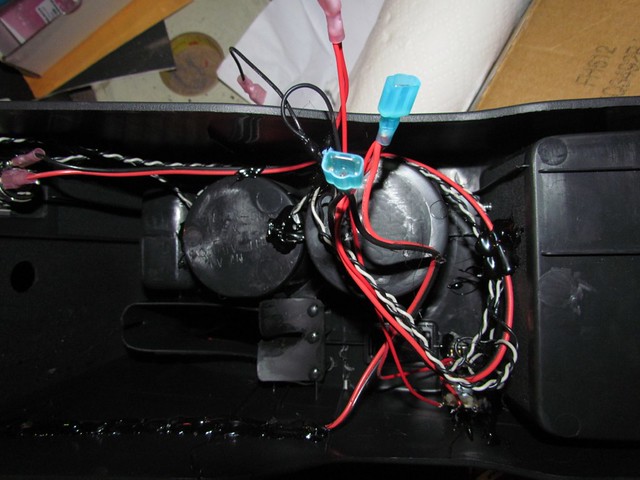
Then, you have a few options depending on how you want to wire them. I simply soldered both the positive leads together, adding a single length of wire on the end of the pair, to tap into the 12V power supply nearby. Repeat for the negative leads.

Image

Now that your LEDs are in, secured, and wired together, you can put the whole thing back in your car. Use self-stripping tap connectors, or "Vampire clips" similar to these:

Image

Remember that connector you unplugged when you took the armrest out? The white wire with the black stripe is the Ground, so tap your negative lead there. The blue wire with the white stripe is positive, so tap that for the positive lead. When you're done, tape up your new connections, and plug the connector onto the 12V outlet.

Your newly-installed LEDs should light up when you turn your key to the On position, as they're wired to the car's 12V system.

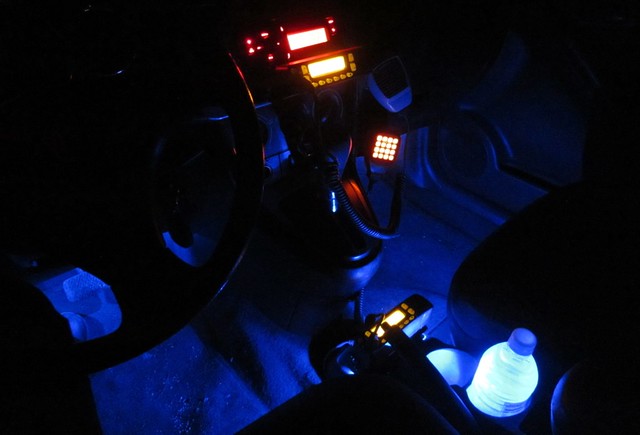
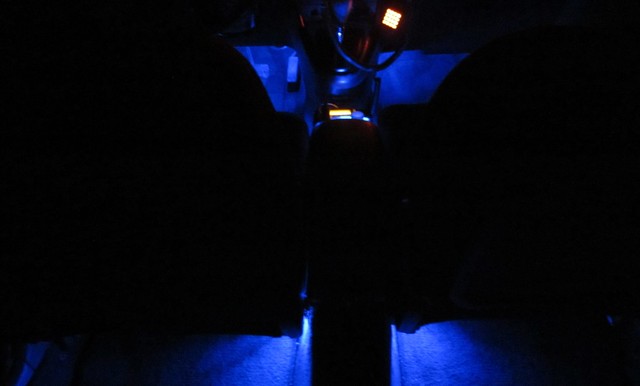
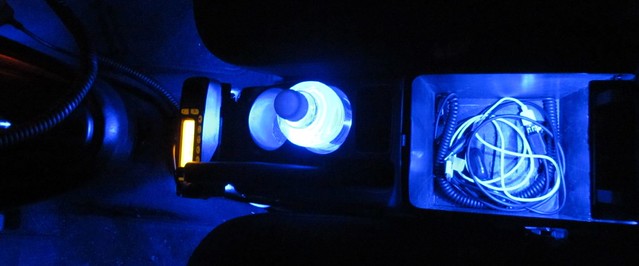
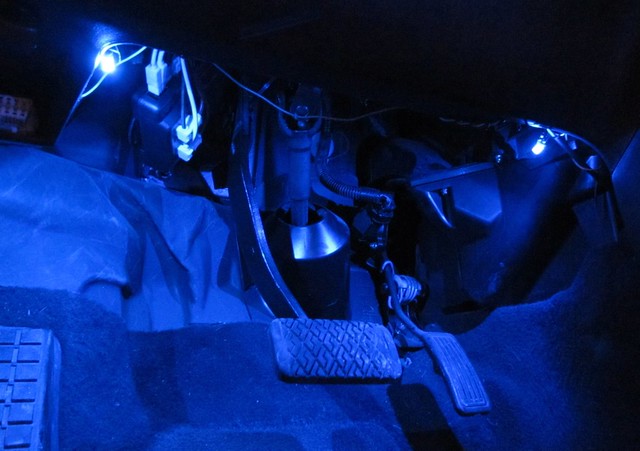
Pictures of the finished product:
Image
Image
Image
Image

They're very bright and light up water / gatorade bottles really well, but they're not blinding. It was well worth the effort to get these in!
Last edited by MrHatchWagon on Thu Apr 04, 2013 4:45 pm, edited 2 times in total.
Image
* Voted May 2012 MOTM! *
How To: Cupholder LED Mod
MrHatchWagon
Posts: 443
Joined: Wed Dec 07, 2011 12:14 am
Location: Bathurst, NB

Re: Cupholder LED Mod

Post by MrHatchWagon »

Thanks, I went with red, to match my head unit and footwell lights. I'll get a picture with everything lit up and add it to the thread as soon as I can!

In the future, I might get some circles made out of Lexan or Plexiglass, and cover up the centers with carbon fiber vinyl to try to diffuse the light a bit more. Time will tell.
Image
* Voted May 2012 MOTM! *
How To: Cupholder LED Mod
Derf
Posts: 529
Joined: Mon Feb 04, 2013 5:19 pm
Location: NW Ohio
Contact:

Re: How To: Cupholder LED Mod

Post by Derf »

I like it. While upgrading the Cigarette / power plugs in the console, you convinced me to make the lighting upgrade.
(Not sure if this should be separate post, due to number of pics)

Needed the above plus the following:
-LED of your choice (Wide angle LED's work best, for my Neptune blue Vibe, used RL5-B12120: 120 degree 5mm Blue LED)
http://www.superbrightleds.com/cat/through-hole/" onclick="window.open(this.href);return false;

-Hot glue gun (Note: rather than tape, or heat shrink, used hot glue to insulate exposed connections, most but not all hot glue is non conductive at low voltages, when in doubt test beforehand)
-Potentiometer 500 ohm or 1 k Ohm seem to work best, can only use 2 LED groups with the following:
http://www.parts-express.com/cat/potent ... g=662|1959" onclick="window.open(this.href);return false;

-Resistors
http://www.parts-express.com/cat/genera ... g=768|2498" onclick="window.open(this.href);return false;

LED's are setup in groups of 4 as follows
+ ____ LED ____ LED ____ LED ____ LED ____ Resistor____ -

Depending on the color you use you many only need groups of three. With your LED specs, use the following link for reference:
http://led.linear1.org/led.wiz" onclick="window.open(this.href);return false;

Each group of resistors is then tied into the potentiometer for dimming as follows
Group 1, Group 2 > Potentiometer Tab A
12v+ feed > Potentiometer Tab B

Final circuit
12v+ __ Fuse __ Switch __ Potentiometer Tab B __ Potentiometer Tab A __ LED Groups __ 12v-

Final results
Image
Image


Console compartment:
Image
Image
Drilled holed at rear of cupholder rather than bottom, to shine light forward rather than up toward driver. Interior comartment drilled hole inside top edge, ran wires "inside" hollow space between interior and exterior


Under seat:
Image
Image
Ran extra wire length, hot glued LED to seat frame. Glue takes a bit to set, with system assembled and on, glue LED and position before glue sets.


Under Dash:
Image
Image
Ran wire from front of console under plastic trim up to dash, then with system on hot glued lights to optimum position. I glued the wires, and left a bit of lead, so the LED can be adjusted in the future


Some of the wiring under the console, hot glue works great on the console plastic, sets up quick, and removes need to drill holes.
Image
Last edited by Derf on Tue May 21, 2013 3:37 pm, edited 3 times in total.
2005 #10,524 Neptune Vibe "Bandit" Auto, Moon & Tunes 235k :D
1991 Pontiac Bonneville 3.8L "Granny's Whip" 142k (33nd Anniversary :o )
Image
MrHatchWagon
Posts: 443
Joined: Wed Dec 07, 2011 12:14 am
Location: Bathurst, NB

Re: How To: Cupholder LED Mod

Post by MrHatchWagon »

That looks great, loving the idea of putting some under the seat too. The light output seems nice and even all over.
Image
* Voted May 2012 MOTM! *
How To: Cupholder LED Mod
tpollauf
Posts: 4023
Joined: Wed Jan 20, 2010 11:37 am
Location: Toledo/Oregon, Port Clinton Ohio
Contact:

Re: How To: Cupholder LED Mod

Post by tpollauf »

Nice job to both of you :D The Blue is sharp and goes with your Neptune Vibe, also the red is sharp any would look awesome in my Red Vibe GT. Someday I'll do a similar mod BUT focusing on other elaborate ideas for the time being. Just need to find some free time & then get motivated :roll:
Image
2009 Vibe GT (manual), 2009 G8Gt, 2009 Vibe GT (auto)
2014 Silverado, 2004 Vibe GT

"everything is modifiable"
Derf
Posts: 529
Joined: Mon Feb 04, 2013 5:19 pm
Location: NW Ohio
Contact:

Re: How To: Cupholder LED Mod

Post by Derf »

MrHatchWagon wrote:That looks great, loving the idea of putting some under the seat too. The light output seems nice and even all over.
I really struggled to think of a good way to mount the LED's under the seat and dash,... Hot Glue gun to the rescue, lot easier than tie wraps, epoxy, or double sided tape, plus its set time allows adjustment to get the light pattern just right. Since the console sits right next to the seat frame, a little planning and you can light the darkness that hides loose change and straw wrappers. Just leave extra length and connectors, so in the future you can lift the console without removing the lights

Here, winters are long and dark, lights in the console compartment and cupholder sure save blinding yourself with the dome light. With floor lights it is extremely weird looking down and seeing your feet.

I had bought two LED strips for the under the dash, but simply not practical for getting the desired effect. Taking your idea further, might put the strips in the hatch area, Putting the LED strips on the bottom of the door, so when the door is open they shine on the ground, would be neat. Would require a lot of work to get wires through the wiring boot in the door. It would put the Vibe on par with the new GM and Ford SUV's that light up the running board when the door is open.
2005 #10,524 Neptune Vibe "Bandit" Auto, Moon & Tunes 235k :D
1991 Pontiac Bonneville 3.8L "Granny's Whip" 142k (33nd Anniversary :o )
Image
tpollauf
Posts: 4023
Joined: Wed Jan 20, 2010 11:37 am
Location: Toledo/Oregon, Port Clinton Ohio
Contact:

Re: How To: Cupholder LED Mod

Post by tpollauf »

Derf wrote: Here, winters are long and dark, lights in the console compartment and cupholder sure save blinding yourself with the dome light.
Amen to that brother :roll: I have several mods on the drawing board but don't want to tackle them till I have the time AND can do a "phase" all at once. An example would be to where you open up a door panel ONLY ONE TIME, do all mods while it is off, put it back on & done forever! I''ve seen what door panels end up looking like after they've been removed repeatedly ... NOT good :x So when I install my LED mirror turn signal/brake/park/puddle lamp assembly to my existing door mirror, it will be done at the same time that I install my LED door handle glow, my door panel command center lights (very dim LED shining on the power window switches so I can SEE them in the dark) and my LED red strobe alerts that will flash to oncoming traffic whenever the door is opened. Hmmmmmmmmmmm ... there just may be more. The key is though to do ALL of this while the door is opened up. Definitely something for next winter when I'm slow. The sky is the limit when it comes to LED modding 8-)
Image
2009 Vibe GT (manual), 2009 G8Gt, 2009 Vibe GT (auto)
2014 Silverado, 2004 Vibe GT

"everything is modifiable"
Derf
Posts: 529
Joined: Mon Feb 04, 2013 5:19 pm
Location: NW Ohio
Contact:

Re: How To: Cupholder LED Mod

Post by Derf »

tpollauf wrote: An example would be to where you open up a door panel ONLY ONE TIME, do all mods while it is off, put it back on & done forever! I''ve seen what door panels end up looking like after they've been removed repeatedly ... NOT good :x So when I install my LED mirror turn signal/brake/park/puddle lamp assembly to my existing door mirror, LED door handle glow, my door panel command center lights (very dim LED shining on the power window switches so I can SEE them in the dark) and my LED red strobe alerts that will flash to oncoming traffic whenever the door is opened. Hmmmmmmmmmmm ... there just may be more. The key is though to do ALL of this while the door is opened up. Definitely something for next winter when I'm slow. The sky is the limit when it comes to LED modding 8-)
Sound like a new thread:
"How many LED's can you fit in a Vibe!" :mrgreen:

Will any of the parts come from other Toyota vehicles, or will they all be custom? The mirrors look easy enough to mod, open spaces and easy access from the doors "sail" panel. Would your flashing LED strobe be in the door, or other location? The door handle might be tricky, their is an internal plastic plate on the inside of the door behind the door handle.
2005 #10,524 Neptune Vibe "Bandit" Auto, Moon & Tunes 235k :D
1991 Pontiac Bonneville 3.8L "Granny's Whip" 142k (33nd Anniversary :o )
Image
tpollauf
Posts: 4023
Joined: Wed Jan 20, 2010 11:37 am
Location: Toledo/Oregon, Port Clinton Ohio
Contact:

Re: How To: Cupholder LED Mod

Post by tpollauf »

Derf wrote: Will any of the parts come from other Toyota vehicles, or will they all be custom?
Totally custom .... EVERYTHING :D
Derf wrote:Would your flashing LED strobe be in the door, or other location?
It will be located very close to the door catch/latch in the door jamb. This way when the door is opened ANYONE or anything behind you will be alerted that the door is open, vehicle is stopped, and DON'T hit me :lol: The more visual lighting on the Vibe, the less likelihood of someone hitting you 8-)
Image
2009 Vibe GT (manual), 2009 G8Gt, 2009 Vibe GT (auto)
2014 Silverado, 2004 Vibe GT

"everything is modifiable"
Post Reply