1st Part, Overview of steps to add sound deadening:
http://www.youtube.com/watch?v=_Xcc4HZO7wE"
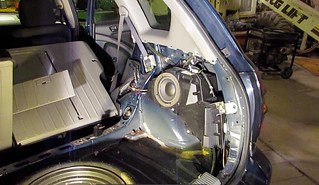
Under the spare tire, I did spots, because the car had undercoating. In reality the whole surface should have been covered with at least one continuous layer. Make sure you use foam, double sided tape, and the Acousta stuff listed below to pad cavities, and isolate plastic and body panels. The key to getting rid of rattles is isolating or immobilizing body panels so they don't vibrate against each other. When you put the body panels back on, make sure to check the fit, if they are loose, use the foam padding listed below to "Shim" the panels to get rid of gaps.
(Update 03/14/13; after testing found road noise still coming in from hatch area, determined I needed to go a slightly different route, ordered some Luxury Liner Pro to put over my base layer):
Here is a link to a decent article with an overview on how to add sound deadening:
http://www.sounddeadenershowdown.com/"
Here is a link to the encapsulated foam, I am trying over top of the base sound deadening:
http://store.secondskinaudio.com/why-second-skin/"
And if you mess up, or want to start from scratch, how to remove sound deadening:
http://www.kiwimotoring.com/blog/post/p ... -deadening"
2nd Part, How to correct the issues with the factory GM Sub Box:
http://www.youtube.com/watch?v=XddO7zKtN6k"
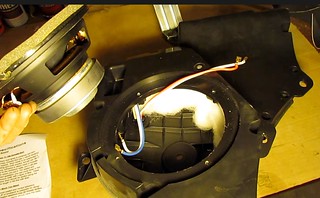
Filling the internal space of the woofer box with Acousta Stuff breaks up the standing sound waves in the box keeping it from "buzzing". Do not over pack, leave the Acousta Stuff fluffed. Use foam padding and Acousta stuff outside the box to keep the body and plastic panels from vibrating against the woofer box. You don't need a lot of sound deadening material on the box, its the careful placement of items outside the box and keeping things "tight" that reduces the rattles, buzzes, and shakes.
3rd Part, Overview of radio and speaker replacement:
Good reference before starting your own upgrade. Their are many threads on this site that cover the same, wanted to put up a video to show more detail.
http://www.youtube.com/watch?v=oOGgu6NbOnA"
- vibe_door_speaker.jpg (20.95 KiB) Viewed 18787 times
Link shows model of amp, connectors, and how wiring was changed.
http://www.youtube.com/watch?v=w_VJsQw_ywc"
Kept Monsoon sub and factory Amp. I am running four door speakers off head unit. Ran new 16 gauge speaker wires from head unit to front seat amp location. Then took the speaker wires off the factory amp and attached them to new 16 gauge wires. I skipped running new wires to the doors since the wiring boots in the doors were to small to push new wires through. I twisted the wires to reduce noise. Used 16 gauge as the stock OEM head unit wiring was 20 or 22 gauge and not suitable for powering speakers. I used the RCA sub outputs on my head unit to feed the factory amp rear speaker inputs. After hooking the system up to the stock amp, you will have to adjust your head unit sub output level and crossover settings. After this mod I ran the bass all the way up,.. no distortion! I am unsure if I reached the maximum output of the OEM amp, or if the filter cap, Acousta stuff, and other corrective measures made the stock sub "behave"
Amp after I changed the wiring around on the stock plugs.
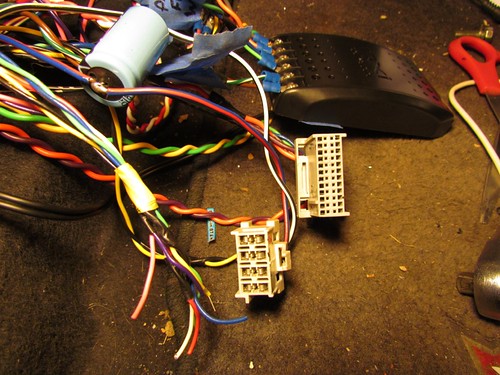
AMP pins on the 200w amp, runs four door speakers, 2 tweeters, and sub box:
Things discovered:
-Stock speakers are 2 ohm
-Front speakers are mid-range with separate tweeter on door, amp sends separate mid and tweeter lines from Front Right / Left channels
-Rear doors are mid-range with integrated whizzer cone, again not full range
-Sub is fed from Rear Right / Left Head Unit audio, amp has sub crossover point predetermined (can not adjust)
-OEM Amp is "200" watts, but is 2 ohm and upon tearing down is as cheap as possible, filter caps are small, and somewhat undersized for being essentially an 8x25 amp
-Amp uses line level input (think RCA jacks on your home stereo) so any line level source can feed it (In theory you could use an iPod to supply audio directly to the stock AMP !), appears to be 3v line level feed
-All door speakers are paper (one was already starting to fail), the tweeters are Mylar, and the 6.5" sub is poly/fiber blend with rubber surround, the sub is the best built OEM speaker in the car.
-Found a "pin" on the amp connector feeding the driver rear speaker was not in all the way (possibly more in 2005, or just oversight on one unit?)
-Sub is in a plastic box, which explains the constant buzzing and muddy bass (have fix for this, see above)
-Their is no sound deadening in the doors or back hatch, which creates muddy sound
-OEM Amp is 8 channel
..Two front highs for tweeter, preset crossover, unable to adjust
..Two front lows for door woofer preset crossover, unable to adjust
..Two rear door, Full Range!!
..Two sub outputs, preset crossover, unable to adjust, fed from Rear Right / Left input audio.
Items used:
Head unit Kenwood KDC-BT952HD (because it has a 7 way EQ, and other features to help tune audio to car, plus it has bells and whistles
http://www.crutchfield.com/p_113BT952HD ... ml?tp=5684"
Front Speaker component system Polk Audio DXi6500 6-1/2" (got them on sale for $134):
http://www.crutchfield.com/p_107DXI6500 ... tml?tp=106"
Although Cruthfield sent adapting plates for the speakers, the Polk supplied adapters worked a lot better.
Rear Speakers Polk Audio DXi650 (got on sale $74)
http://www.crutchfield.com/p_107DXI650/ ... html?tp=95"
Acousta Stuff used to fix resonance and bad "VIBEraitons" in the plastic woofer box:
http://www.parts-express.com/pe/showdet ... er=260-317"
Sound deadening material used in the doors and back hatch and rear wheel wheels, more is better, but careful placement of foam padding is best!
http://www.parts-express.com/pe/showdet ... er=268-204"
and spray for inside doors (very low odor, water based and dries fast)
http://www.parts-express.com/pe/showdet ... er=268-250"
and standing wave dissipation pads for behind front door speakers:
http://www.parts-express.com/pe/showdet ... er=268-242"
Used the following over top the base sound dampening layer on some areas:
http://store.secondskinaudio.com/luxury-liner-pro/"
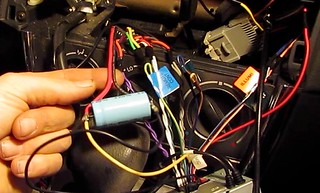
Filter cap used in Head unit and Factory Amp power:
http://www.parts-express.com/pe/showdet ... r=020-1068"
How to wire it up:
http://www.stompaudio.com/index.php?mai ... page&id=16"
I used the axial version, because it provides better separation of the + and - wires and once soldered is very easy to cover conductors with good electrical tape. These caps are polarity dependent, so do not hook them up backwards.
Looking for any input on anyone that has upgraded their radio system. I did it because I could not stand the "muddy" audio and the constant buzzing of the bass notes.
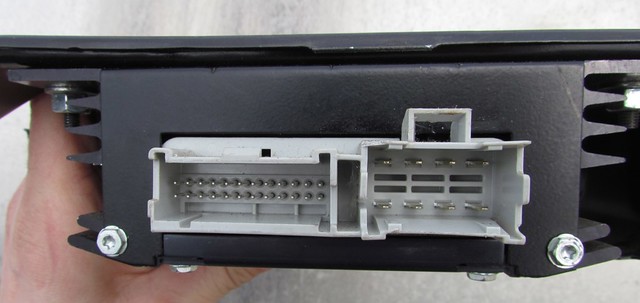
Attached, wiring pinouts for amp harness located under the front passenger seat.